Quantcast
Channel: AIX for System Administrators
Viewing all 67 articles
Browse latest View live

WPAR

$
0
0

WPAR (Workload Partition)

Workload Partitions (WPARs) are virtualized operating system environments that are created within a single AIX image. WPAR has its own private execution environment with its own filesystems and network addresses, but they still run inside the global environment. The global environment (the actual LPAR) owns all the physical resources of the Logical partition. (WPAR on AIX is like Docker and other container technology on Linux, or Zones on Solaris.)

To create a WPAR bos.wpars package needs to be installed on a minimum AIX 7.1 server. WPAR creation time takes few minutes, output will show additional filesystems have been created automatically and about 300 AIX packages (filesets) are installed in the new environment.

Global environment
This term refers to the LPARs with the AIX operating system that hosts WPARs. This environment is the classical AIX environment.  The global environment has visibility into the WPARs, and can see all processes running inside a specific WPAR.  WPARs can be created only in the global environment.

--------------------------------------

System WPARs and Application WPARs
Based on the command to create WPARs we can differentiate between System WPARs (mkwpar) and Application WPARs (wparexec)


System WPAR (mkwpar)
System WPARs are virtual AIX environments with their own private file systems, users and groups, login and network configurations. Most traditional system services (like cron, inetd …) are virtualized at the WPAR level, and they can be independently used within each WPAR. Each system WPAR has dedicated writable file systems, although it can share the global environment /usr and /opt file systems in read-only mode. When a system WPAR is started, an init process is created for it, which in turn spawns other processes and daemons

System WPARs are created with the command "mkwpar" and based on the flag we use, following System WPARs can be differentiated:
- shared system WPAR:         (default) /usr and /opt is shared in read-only mode from the global environment
- non-shared system WPAR:     (also called private or detached WPAR) it has private and writable versions of /usr and /opt file systems
- rootvg WPAR:                it is created with its own rootvg on a given disk, it can be shared or non-shared
- system copy WPAR:           content of filesystems of global environment are copied over to the WPAR, it can be shared or non-shared
- versioned WPAR:             different AIX version (AIX 5.2 or 5.3) runtime environment than the global environment, always non-shared


Application WPAR (wparexec)
Application WPARs provide an environment for application isolation. Application WPARs have less usage on system resources than system WPARs and they don't have their own system services (cron, inetd…). It is suitable for execution of one or more processes that can be started from a single command.

--------------------------------------

Shared and non-shared system WPARs (mkwpar … and mkwpar -l …)

By default, a system WPAR shares the /usr file system and the /opt file systems from the global environment using read-only mounts. You can configure WPARs to have non-shared, writable /usr and /opt file system with mkwpar -l.

If you create a non-shared system WPAR, all files from the /usr file system and the /opt file system in the global environment are copied to the WPAR. The administrator must allocate enough space in the WPAR file systems for the files. System software in non-shared system WPARs must be kept at the same system level as the global environment in order to avoid unexpected results.

In the global environment the /wpars directory is used for filesystems of the WPARs. For example, users in a WPAR called wpar1, would see the /wpars/wpar1/usr directory as the /usr directory.
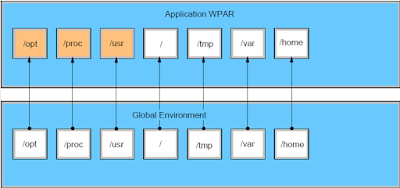
The file system configuration for a WPAR is specified when the WPAR is created. You can either use the system defaults or customize each file system. Some of the file systems in a system WPAR are local to the partition while others can be shared with the global environment.

/ , /tmp, /var, /home JFS2 file systems are created with inline logs and populated similar to a stand-alone AIX system. /usr and /opt JFS2 file systems are shared from the global environment using namefs mounts with read-only permissions. /proc is also shared from global environment, but with read-write permissions.


For shared system WPARs, all changes within the /usr and the /opt file systems are immediately visible within the WPAR. You can configure WPARs to have non-shared, writable /usr and /opt file system (mkwpar -l), which makes application installation simpler. Detached WPARs (non-shared /usr) provide improved flexibility by allowing the installation of different software in a WPAR than existing software in a shared WPAR environment. When it is necessary to have detached WPARs, you can use the syncwpar and inuwpar commands to manage the system software in detached WPARs and recover from situations where the WPAR has become incompatible with the global environment.

When a private WPAR is created, the complete /opt and /usr filesystems are copied to the WPAR's own filesystems. Although there are scenarios where keeping private copies of these filesystems are beneficial, in some cases this would be unnecessary.

For example, if our application writes only one directory under /opt (like /opt/ibm/wlp), then it is not needed to have write permisions for the full /opt (and copy the whole content of that), just only this one directory. To achieve this, we create a mount point (mkdir -p /opt/ibm/wlp), then during creation of a shared WPAR we use the -M option to tell which filesystem to export to the wpar:
mkwpar -M directory=/opt/ibm vfs=jfs2 size=2G -r -n toyman -N address=9.3.63.36 broadcast=9.3.63.255

If a WPAR is configured to have writable, non-shared /usr and /opt filesystems, the AIX system software within that WPAR cannot be directly managed from within the WPAR. Operations that are prevented on system software include apply, commit, deinstall, and reject. If it is necessary to modify system software within a non-shared WPAR, use the /usr/sbin/swvpdmgr -w <fileset_names> command to allow those file sets to be directly managed within the workload partition.

Each WPAR has an isolated network environment with unique IP addresses and a unique hostname. You can access WPARs through standard networking programs, such as telnet, ftp, and rlogin (d 

Simple WPAR creation:
1. add an entry for the new system WPAR to the /etc/hosts file on the server. (test it with host <wparname>)
2a. create a shared WPAR: mkwpar -n WPARname
2b. create a non-shared WPAR: mkwpar -n WPARname -l

--------------------------------------

Rootvg WPAR (mkwpar -D devname=hdiskX rootvg=yes …)

A system WPAR which is configured with its own root volume group on a disk is called a rootvg WPAR. rootvg WPAR gives complete control over managing the storage devices exported to the WPAR, the volume groups on those devices, and the logical volumes and file systems within those volume groups. A system WPAR which is not a rootvg WPAR does not have its own root volume group, but has file systems created in logical volumes created out of the root volume group of the global system.

For a rootvg WPAR, storage devices must be exported (or allocated) to the WPAR when it is created. After it has been created, the chwpar command can be used to allocate additional disks to the WPARs root volume group or, if it contains multiple disks, to deallocate a disk. It is not possible to change a WPAR into a rootvg WPAR after it has been created.

When a system WPAR is created with its own root volume group by using the command mkwpar -D devname=hdiskX rootvg=yes … command, the root file systems are created in a separate volume group that is owned and managed by the WPAR. Rootvg system WPARs can be either a detached system rootvg (non-shared /usr) or a shared system rootvg. 

A detached (private copy of /usr and /opt) system rootvg WPAR is created with the mkwpar command with the “-l” flag like:
mkwpar -n wparm91 -D devname=hdisk4 rootvg=yes -D devname=hdisk0 -N interface=en0 address=172.16.20.90 netmask=255.255.252 .0 -I rtdest=0 rtgateway=172.16.20.1

---------------------------------------

System copy WPAR (mkwpar -t …)

A system copy WPAR is created by copying the files from the root volume group of an existing AIX system or an AIX system backup image. A system copy WPAR contains configured files and file systems directly from its source. A system copy WPAR differs from a standard system WPAR because it contains the files and file systems from the root volume group of the source system. A standard WPAR is created as a newly installed system by installing a new and unconfigured environment.

The /usr and /opt file systems from the global system are not copied if the WPAR is created as a shared WPAR. If the WPAR is created with the -l option (or if the privateusr=yes attribute is set in the
general stanza of a WPAR specification file), the /usr and /opt file systems are copied into the WPAR. Otherwise, the WPAR mounts the /usr and /opt file systems in read-only mode from the global
system. A system copy WPAR can be created as a rootvg WPAR.

Creating a system copy WPAR from a system backup image: mkwpar -t -B <mksysb_image> -n <WPARname>
Creating a system copy WPAR from the running system: mkwpar -t [-l] -n <WPARname>
(It is also possible to set the general attribute system_copy to yes in a WPAR specification file: system_copy=yes)

---------------------------------

Versioned WPAR (mkwpar -C …)

A versioned WPAR has a runtime environment from an older AIX mksysb backup image and runs on a global system with a newer level of AIX. The AIX commands and libraries inside the WPAR support the older AIX level's syntax, even though the AIX kernel on the system is running a newer level. Applications that have not been certified on newer versions of AIX, can use the versioned WPAR commands and libraries (like AIX 5.2 and 5.3) on top of an AIX 7.1 kernel.

A versioned WPAR is always a system WPAR and is not shared. Versioned WPARs own writable /opt and /usr file systems.

A versioned WPAR provides a different version runtime environment than the global system. To see the files within a versioned WPAR that are replaced by local or alternative programs, run the following command within the versioned WPAR: ODMDIR=/usr/lib/objrepos odmget file_overlay | awk ’$1=="path" {print $3}’
If you have AIX 5.2 Workload Partitions for AIX 7 run the following command: ODMDIR=/usr/lib/objrepos odmget overlay | awk ’$1=="path" {print $3}’

Creating a versioned WPAR:
1. create a mksysb image of an AIX 5.2 (TL10 SP8) or an AIX 5.3 (TL 12) system that provides the content for your versioned WPAR: mksysb -i /mksysb_images/backupname
2. copy mksysb to target AIX 7.1 or 7.2 server, and update there /etc/hosts with the name of new versioned WPAR (FQDN and alias), check with host command (host <wparname>)
3. install vwpar.image package on target server, like: installp -qaXYd installation_device vwpar.images vwpar.sysmgt
4. create version wpar: mkwpar -n WPARname -C -B /mksysb_images/backupname

The remainder of the installation is similar to that of the creating a new WPAR, except that it will use the AIX 5.2 system image as the basis, installing the system packages for AIX 5.2.

---------------------------------

Application WPAR (wparexec)

Application workload partitions (WPARs) provide an environment for isolation of applications and their resources. Application WPARs have less usage on system resources than system WPARs, they do not require their own instance of system services.

Application WPARs share the filesystems of the global environment. When an application WPAR is created, it has access to all mounts available to the global environment's file system. If additional dependencies are required, you can customize the WPAR during creation using the wparexec command with the -M option


Application WPARs are created with the wparexec command. You must supply the path to the application or command that you want to create an application WPAR for, and you must supply any command line arguments when you run the wparexec command. The application can either come from a specification file, or be specified on the command line. Unlike system WPARs, it is not necessary to assign an explicit name to an application WPAR. Although both WPAR types require a name, the names for application WPARs are generated based on the name of the application running in the WPAR.

Creation of an application WPAR (as root in the global environment):
wparexec -n wparname -- /usr/bin/ps -ef > /ps.out

Application WPARs start as soon as the wparexec command is issued, and stop as soon as the application completes its operation. When the operation is complete, the configuration for the application WPAR is destroyed.

--------------------------------------

Devices

The support of devices in the WPAR is limited to fiber-attached storage devices, fiber channel adapters, and vSCSI disks.

To deploy a device to a WPAR, the command mkwpar -D or chwpar -D can be used. The device in the global environment must be in the available or the defined state. One or more storage devices can be used and non-rootvg volume groups, logical volumes, and file systems can be created within the WPAR.

mkwpar -D devname=<device name> -n <wpar name>                      allocate a device while creating the WPAR
mkwpar -D devname=<device name> rootvg=yes -n <wpar name>          allocate a device while creating a rootvg WPAR
chwpar -D devname=<device name> <wpar name>                         allocate a device to an existing WPAR
chwpar -K -D devname=<device name> <wpar name>                      deallocate a storage device from an existing WPAR

When you allocate a storage device to an active WPAR, the device is exported to the WPAR unless it was previously exported. To import the newly allocated device into the WPAR, run cfgmgr within the WPAR.

A storage device can be allocated to more than one WPAR. However, the device can be exported to only one WPAR at a time. The device is exported to the WPAR that starts first. After a device is exported to a WPAR, the extended state of the device is listed as Exported. 

# lsdev -x -l hdisk1
hdisk1 Exported 01-08-02 MPIO Other DS4K Array Disk

---------------------------------

Applications and filesystems sharing

In the WPAR, /usr and /opt are mounted by default as read only filesystems, so if our application needs to touch these filesystems, some planning would be needed. I tried to collect different scenarios, when a filesystem from the global environment needs to be shared in the WPAR:
  
1. If application doesn't install into /usr or /opt, or touch those file systems after installation, you can install them into the WPAR as normal.

2. If application installs into /usr and /opt, but do not touch those file systems after installation, it needs to be installed into the global environment and then execute syncwpar on all "shared" WPARs (those with read-only /usr and /opt) in which you wish to execute the application.

3. If application touch files in /usr and /opt after installation then create your WPAR with private /usr and /opt (mkwpar -l) and install them inside the WPAR.

4. If application writes only to a sub-directory of /opt but you don't want a private /opt, then you can add a read-write directory to the read-only shared /opt:
     # mkdir /opt/new                          <--in global environment create a mount point which will appear in the WPAR /opt
     # crfs -v jfs2 -g rootvg -m /wpars/wpar1/opt/new -a size=10M   <--create a filesystem
     # mount /wpars/wpar1/opt/new              <--mount it into the wpar (after in wpar we can write files in it)

5. Temporarily sharing a global file system with a WPAR (with "namefs"):
     # mkdir /wpars/wpar2/bb_fs                <--create /bb_fs mount point (we want to share the global /bb  as /bb_fs in the WPAR)
     # mount -v namefs /bb /wpars/wpar2/bb_fs  <--mount "namefs" filesystem, /bb will be mounted as /bb_fs in the wpar

6. Permanently sharing a global file system with a WPAR, with auto mount (with "namefs"):
    # crfs -v namefs -A yes -d /bb -m /wpars/wpar1/bb_fs -u wpar1  <--create "namefs" filesystem from the global /bb as …/bb_fs in wpar, -u (mount group) should be the name of the wpar
    # mount /wpars/wpar1/bb_fs                  <--after mounting in the global, in the wpar it will appear as /bb_fs (read-write)

7. Sharing a filesystem across 2 WPARs (without NFS, using "namefs):
If you have a filesystem called /local and want to add this to two WPARs called wpar1 and wpar2:
    # mkdir /wpars/wpar1/local
    # mkdir /wpars/wpar2/local
    # mount -v namefs /local /wpars/wpar1/local
    # mount -v namefs /local /wpars/wpar2/local

---------------------------------

Commands:

mkwpar -n <wparname>                         create a shared system wpar (-A will create as autostart)
mkwpar -s -n tyrant -l -N address=9.3.63.38  create a private wpar (option -l specifies that the WPAR being created is a private WPAR)
mkwpar -n wpar3 -N interface=en0 address=172.23.74.22 netmask=255.255.248.0               create  shared wpar with network details
mkwpar -n w4 -D devname=hdisk1 rootvg=yes -N interface=en0 address=172.23.74.22 netmask=255.255.248.0 -l  create a non-shared rootvg wpar


lswpar                                        lists wpar details (name, state, type…)
     WPAR States:
     (D) Defined       it has been defined by the mkwpar  command and is ready for use, but is not active (startwpar will start it)
     (L) Loaded        it has been configured in the kernel, but processes have not yet been started.
     (A) Active        it is running normally.
     (F) Frozen        a checkpoint operation is initiated, and the processes are quiesced, awaiting the storing phase.
     (P) Paused        a checkpoint or restart operation was done, and the processes of the WPAR are ready to be resumed or killed. 
     (N) Maintenance   it has been configured in the kernel and the file systems have been mounted, but processes do not start.
     (M) Moving        although wpar is Active on the arrival server, on the departure server in this state until transfer is completed
     (T) Transitional  an administrative operation is in progress. The wpar is being created, started, stopped, configured, and so on.
     (B) Broken        an administrative operation failed, leaving this workload partition in an unusable state.
     (E) Error         an error occurred because of invalid elements such as workload partition name and flags.

lswpar -L                                     list wpars with all details (long format): network, filesystems, resource controls…..
lswpar -R <wparname>                          list a wpar resource controls (CPU, Memory limits…)

startwpar -v <wparname>                       start a wpar (-v verbose)
stopwpar -v <wparname>                        stops a wpar (waits about 30 seconds), same as "shutdown" in the wpar
stopwpar -F <wparname>                        stops a wpar immediately (-F force) 
                                              (if halt -q is used, wpar might not stop cleanly, which leaves it in transition state.)
rmwpar <wparname>                             removes a wpar

clogin <wparname>                             login to the given wpar, it is like a console login (it is not an ssh login)
ps -ef@ wpar1                                lists the processes of an wpar
lparstat -W                                   wpar related lparstat (CPU) details
uname -n                                      shows the name of the wpar (good way to find out where we are)
uname -W                                      shows the id of the wpar (good way to find out where we are)

savewpar -f <file> <wparname>                 back up a WPAR to a file (savewpar -f /tmp/wpar1_backup.bff wpar1)
restwpar -f/dev/rmt1                          creates a wpar from a wpar backup image that was created by savewpar, mkcd, or mkdvd
restwpar -s -F -f /tmp/wpar1_backup.bff -h toyman -n toyman -d /wpars/toyman -M '-N address=9.3.63.36 broadcast=9.3.63.255'

syncwpar <wparname>                           synchronizes the software that is installed in the global shared parts with wpar
syncwpar -A                                   synchronize all WPARs (If you patch the global AIX level then execute syncwpar -A.)
syncwpar -D …                                 if there are private wpars, use -D (detached wpars)

migwpar                                       migrate a WPAR from AIX 6.1 to AIX 7.1. (or migrate a versioned WPAR from AIX 5.2) 

---------------------------------

Changing a WPAR’s IP address

On the global environment:
# mkwpar -n wpar1 -N address=172.16.20.100 netmask 255.255.252.0          <--create a wpar with given IP
# chwpar -K -N address=172.16.20.100 wpar1                                <--remove IP from wpar
# chwpar -N address=172.16.20.102 netmask=255.255.252.0 wpar1             <--configure new IP

There is no direct way to change the address of a system WPAR network; you must remove the old network with the chwpar -K command and add the network with the new address

---------------------------------

Configuring domain resolution for system WPARs:

You can configure the domain resolution for system WPARs using the -r flag for the mkwpar command. Files such as the /etc/resolv.conf file do not exist in system WPARs by default.

To copy the global environment's domain resolution configuration into the system WPARs, run: mkwpar -n wpar_name -r

Running this command copies the following files into the system WPARs, if they exist in the global environment:
/etc/resolv.conf
/etc/hosts
/etc/netsvc.conf
/etc/irs.conf
/etc/networks

---------------------------------

Allocate disk to a WPAR

A disk can be allocated to either an active or inactive WPAR. The chwpar syntax is the same for both scenarios. 

Add a disk to a running WPAR:
Global# chwpar -D devname=hdisk2 wpar1                                    <---assign the disk to the WPAR
Global# clogin wpar1                                                      <--login to the WPAR
WPAR1# cfgmgr                                                             <--in the WPAR scan for new devices
WPAR1# lspv                                                               <--list new disk

Alternatively, a disk can be allocated to a WPAR during its creation time. You must specify the -D option of the mkwpar

How to remove a disk from a WPAR
Global# chwpar -K -D devname=hdisk2 wpar1

---------------------------------

Configuring resource controls for system WPARs

You can configure the resource controls to limit the physical resources a system WPAR has access to using the -R flag for the mkwpar and chwpar commands.

To initialize resource control settings, run the following mkwpar command:
mkwpar -n wpar_name -R active=yes CPU=10%-20%,50% totalProcesses=1024

In this example, the WPAR is entitled to the following system resources:
A minimum of 10% of the global environment’s processors upon request
A maximum of 20% of the global environment’s processors when there is contention
A maximum of 50% of the global environment’s processors when there is no contention
A maximum of 1024 processes at a time

The active attribute can be set to yes or no. When the active attribute is set to no, resource controls are disabled, but the settings are maintained in the configuration database.
To change resource control settings dynamically for an existing active or inactive application WPAR run the following chwpar command:
chwpar -R totalThreads=2048 shares_memory=100 wpar_name

You can also use the -K flag for the chwpar command to remove individual attributes from the profile and restore those controls to their default, as follows:
chwpar -K -R totalProcesses shares_CPU wpar_name


DHCP (Dynamic Host Configuration Protocol)

$
0
0
DHCP (Dynamic Host Configuration Protocol) 

DHCP allows to get an IP address and other network parameters, like gateway, DNS server IP, subnet mask etc. (It is a client - server setup.)

The DHCP facility assigns an IP address for a specified period of time known as a lease, using the following process:
- The requesting (client) system broadcasts a DHCP Discover message to UDP port 67. At this point, the system does not need to know anything about the local network, not even the subnet mask (the source address for this message is 0.0.0.0, and the destination is 255.255.255.255).

- One or more DHCP servers reply with a DHCP Offer message (to UDP port 68), containing an IP address, subnet mask, server IP address, and lease duration (and possibly other parameters). The server reserves the offered address until it is accepted or rejected by the requesting client or a timeout period expires.

- The client selects an offered IP address and broadcasts a DHCP Request message. All servers other than the successful one release the pending reservation.

- The selected server sends a DHCP Acknowledge message to the client.

- When the lease is 50% expired, the client attempts to renew it (via another DHCP Request). If it cannot do so at that time, it will try when it reaches 87.5% of the lease period; if the second renewal attempt also fails, the client looks for a new server. During the lease period, DHCP-assigned parameters persist across boots on most systems. On some systems, the client tries to extend its lease each time it boots.


dhcpcd: dhcp client daemon
dhcprd: dhcp relay agent daemon (usually routers are configured to pass the dhcp requests/replies to different networks and or subnets, so dhcprd is not used)
dhcpsd: dhcp server daemon


The DHCP client daemon is dhcpcd. The daemon runs on port 68..
The DHCP client configuration file is /etc/dhcpcd.ini


/etc/options.file       <--contains dhcp option definitions


In /etc/rc.tcpip:
# Start up dhcpcd daemon
start /usr/sbin/dhcpcd "$src_running"

# lssrc -ls dhcpcd
LogFileName:     /usr/tmp/dhcpcd.log
Logging:         ENABLED
Tracing:         NOT ACTIVE
Interface        IP Address     Duration  Start     End
en0              17.16.116.115  3600       1527666340 1527669940
Subsystem         Group            PID          Status
 dhcpcd           tcpip            3538946      active


more details:
https://technet.microsoft.com/pt-pt/library/cc780760(v=ws.10).aspx

------------------------------------

/etc/dhcpcd.ini

The DHCP client configuration file is /etc/dhcpcd.ini
It contains the configuration information for the DHCP client program (dhcpcd).

Common DHCP Options:
1  Netmask
3  Default gateway
6  Nameserver
12 DHCP Client hostname
15 Domain name

119 is the search domain suffix list, but AIX does not support this :(

syntax used in this file:
option <code value> -- An option requested by the client (if it is inside the curly braces, it is valid for the mentioned interface only, if outside then applies to all interfaces)
reject <code>       -- Specifies that if this option code is returned by the server, this option should be ignored by the client. Its value should not be used.

After dhcpcd.ini is configured, the dhcp client daemon (dhcpcd) should be started, which will read this file during start up:
# startsrc -s dhcpcd

------------------------------------

dhcp and resolv.conf

an example from dhcpcd.ini:
interface en0
{
option 12 "my-aix-hostname"
}


If using above setting, dhcp will update resolv.conf with domain and nameserver details. Additionally hostname will be set (to FQDN: my-aix-hostname.example.domain), also gateway will be configured and netmask as well. Only the search list will not inserted into resolv.conf, that would be option 119 in dhcpcd.ini, but IBM does not support that.

Some additional details regarding search vs domain entry in resolv.conf:
The domain entry and search entry are mutually exclusive. If both entries are used, the one that appears last will override the other. The search entry can have up to a maximum of 1024 characater strings for the DomainName variable. The first DomainName variable is interpreted as the default domain name.

------------------------------------

example from /etc/dhcpcd.ini:

updateDNS "/usr/sbin/dhcpaction '%s''%s''%s''%s' A NONIM >> /tmp/updns.out 2>&1 "      <--it requestes to update the DNS server with the new IP address
clientid MAC                                             <-- client id to use in all communication with server
                                                         (MAC: MAC address, HOSTNAME: host name should be used as client id)

interface en0                                            <--interface for DHCP (I have seen "any" as well)
{
option 1 255.255.255.0                                   <--specified netmask is requested/accepted
reject 3                                                 <-- Do not accept the default gateway
reject 6                                                 <-- Do not accept the nameserver
reject 15                                                <-- Do not accept the domain name
otheroptions accept                                      <-- Specifies how all other options should be handled (default is all accepted)
                                                         (it refers to any options not specifically mentioned)
}

------------------------------------

our new config:
interface en0
{
option 12 "my-hostname"
}

-----------------

our older configs:
interface en0
{
option 12 "my-hostname"                              <--this line will register server in DNS
option 15 "our.example.domain.com"
option 19 0
option 20 0

In this older config, hostname will looks like: my-hostname.our.example.domain.com, which is hardcoded, and if we migrate server to another domain, it will still have that wrong FQDN locally.

------------------------------------

Article 4

$
0
0
Syntax recommendations in general:

- Donʼt forget commas and colons. (Forgetting them causes parsing errors.)
- The resource type and the attribute names should always be lowercase.
- The values used for titles and attribute values will usually be strings, which you should usually quote. 
- There are two kinds of quotes in Puppet: single (') and double ("). Double quotes let you interpolate $variables.
- Attribute names (like path, ensure, etc.) are special keywords, not strings. They shouldnʼt be quoted.
- It is recommended visually lining up the => arrows, because it makes it easier to understand a manifest at a glance.
- Puppet disallows duplicate titles within a given type (you canʼt declare the same resource twice)

=========================================

Variables:

$my_variable='A bunch of text'
notify{$my_variable:}

Variables can hold strings, numbers, booleans, arrays, hashes, and the special undef value. If youʼve never assigned a variable, you can actually still use it - its value will be undef. Always include curly braces ({}) around variable names when referring to them in strings, for example, as follows:
$value = "${one}${two} is the new value"
source => "puppet:///modules/webserver/${brand}.conf",

notify { "operatingsystem is ${::operatingsystem}": }     <--printing out variables


Variable scope:
Each class and definition introduces a new scope, and there is also a top scope for everything defined outside of those structures. Variables cannot be redefined inside the same scope they were defined in. (Puppet does not rely on order or sequence of the code, so redefining a variable (changing a value) would cause problem, because puppet does not know which definition is the first.)

Top scope is anything declared in site.pp or imported manifests. Top scope can be explicitly accessed by prepending :: to a variable. It is best practice to write fact variables as $::osfamily so as to use the fact at top scope, thus preventing the variable from being overwritten anywhere.

Local scope is the scope of a single class or defined type.

If you reference a variable with its short name and it isnʼt present in the local scope, Puppet will also check the global top scope, so short name is most of the cases works well.
$variable               short variable name
$scope::variable         fully qualified variable name, e.g. name => $::ssh::params::ssh_package_name (the variable $ssh_package_name can be found in ssh::params class)
$::variable             top scope variable name

All of the facts from facter can be referenced as top scope variables, e.g. the fully qualified domain name (FQDN) of the node may be referenced by "${::fqdn}". For the highest level scope, top scope or global, use two colons (::) at the beginning of a variable identifier: ${::fqdn} (:: is like / root)

file { '/etc/motd':
 content => "Welcome to ${::fqdn}\n"
}

People who write manifests often adopt the habit of always using the $::variable notation when referring to facts. As mentioned above, the double-colon prefix specifies that a given variable should be found at top scope. This isnʼt actually necessary, since variable lookup will always reach top scope anyway.

=========================================

Quotes, Regular expressions

Always quote parameter values that are not reserved words in Puppet. For example, the following values are not reserved words:
name => 'dave',
mode => '0700',
owner => 'root',

However, these values are reserved words and therefore not quoted:
enable => true,
ensure => running,


Regular expressions:
if $::architecture =~ /64/ {    <--the text between the slashes to be matched (like grep 64)
if $::kernel !~ /Linux/ {      <--if the text does not match

Ruby's regular expression syntax at this website: http://www.tutorialspoint.com/ruby/ruby_regular_expressions.htm

===========================

If condition

An example code for if condition, which could be run with puppet apply:
$color = 'blue'

if $color == 'blue' {
  notify {"it is blue":}
}
else {
  notify {"it is not blue":}
}

----------------------------------------------

if $::timezone == 'UTC' {
if $::timezone != 'UTC' {
if $::uptime_days > 365 {
if $::mtu_eth0 <= 1500 {
if ($::uptime_days > 365) and ($::kernel == 'Linux') {
Boolean expressions: or, and 
if $crewmember in ['Frank', 'Dave', 'HAL' ]

----------------------------------------------

The condition for an if statement has to resolve to a boolean true/false value. However, all facts are strings, and all non-empty strings — including the string "false"— are true. This means that facts that are “false” need to be transformed before Puppet will treat them as false.

In this case, weʼre using the str2bool function. Surrounding the variable with double quotes — if it contained an actual boolean for some reason (and it usually wouldnʼt), this would convert it to a string. Passing the string to the str2bool function, which converts a string that looks like a boolean into a real true or false value:

if str2bool("$is_virtual") {
  notify {"it is true":}
}
else {
  notify {"it is false":}
}

The str2boolfunction is part of the puppetlabs/stdlib module, which is included with Puppet Enterprise. If you are running open source Puppet, you can install it by running: 
sudo puppet module install puppetlabs/stdlib

===========================

Case condition

case $operatingsystem {
  centos: { $apache = "httpd" }
  redhat: { $apache = "httpd" }
  debian: { $apache = "apache2" }
  default: { fail("Unrecognized operating system for webserver") }
}
package{'apache':
  name   => $apache,
  ensure => latest,
}

(The above used fail function doesnʼt resolve to a value; instead, it fails compilation immediately with an error message.)

----------------------------------------------
Another example wit regex:
case $ipaddress_eth0 {
  /^127[\d.]+$/: {
    notify{'misconfig':
      message=>"Possible network misconfiguration: IP address of $0",
    }
  }
}

Regex matches also assign captured subpatterns to $1, $2, etc. inside the associated code block, with $0 containing the whole matching string.
----------------------------------------------
===========================

Array:

Adding square brackets [] around a list:
package { [ 'package1', 'package2', 'package3' ]: ensure => installed }     <--  array (specify many items in a  single resource)

or…

$packages = [ 'ruby1.8-dev',
 'ruby1.8',
 'ri1.8',
 'libopenssl-ruby' ]

package { $packages: ensure => installed }

===========================

Hash:

A hash is like an array, but each of the elements can be stored and looked up by name (referred to as the key), for example (hash.pp):

$interface = {
 'name' => 'eth0',
 'ip' => '192.168.0.1',
 'mac' => '52:54:00:4a:60:07'
}

notify { "(${interface['ip']}) at ${interface['mac']} on
 ${interface['name']}": }

===========================

Selector:

$lunch = 'Filet mignon.'
$lunchtype = $lunch ? {
 /fries/ => 'unhealthy',
 /salad/ => 'healthy',
 default => 'unknown',
}
notify { "Your lunch was ${lunchtype}": }

===========================

Loops

Most commonly an array is used to repeat a test with different values.

$packages = ['vim', 'git', 'curl']  

package { $packages: 
   ensure => "installed" 

===========================

Article 3

$
0
0
Resources

When we write puppet code in a manifest file, we want to modify resources on the server. A resource can be anything which is possible to configure on a system, like a user account, a specific file, a directory, a running service, a software package etc. These resources (for example all the users on a server) can be grouped to a resource type, in this case it is called "user".

From this resource type we can create or modify a specific resource( like a user called 'dave'), which has a number of attributes (uid, gid ...). Each attribute has a specific value. 

An example for a resource declaration:
user { 'dave':
  ensure => present,
  uid    => '507',
  gid    => 'admin',
  shell  => '/bin/zsh',
  home   => '/home/dave',
  managehome => true,
}

Some resource related puppet commands:
puppet describe -l                    list all of the resource types available on the system
puppet describe -s <TYPE>             print short information about a type

puppet resource user root              lists the given resource and attributes
puppet resource user katie ensure=present shell="/bin/bash"   setting a new desired state for a resource
puppet resource user katie --edit       change a resource in text editor, after it is saved Puppet will modify that resource

Almost every resource type has one attribute whose value defaults to the resourceʼs title.  For example for the file resource the path attribute is not really needed as it is the default as the title.  Most of the time (user, group, package…), itʼs name.

=========================================

Resource Capitalization:

After creating a resource we can refer to that resource using the name  with capital letter. For example if we create a file resource we can refer to that resource using the name File[ ...]:
file { "sshdconfig":
 path => "/etc/ssh/sshd_config",
 ...
}

service { 'sshd': 
   require => File['sshdconfig', 'sshconfig', 'authorized_keys']
}   

We can now refer to this resource as File["sshdconfig"] as an aliased shorthand Same applies to other resource types, like package. If we create a package named httpd, if we wanted to refer to this package later, we would capitalize its type (package): Package['httpd']

You only use the lowercase type name when defining a new resource. Any other situation will always call for a capitalized type name.

=========================================

User resource:

user { 'vipin':                <--resource type is "user" and the resource title is "vipin" (the title of a resource can be referred to in other parts of puppet code)
   ensure => present,          <--attibutes are ensure, uid, shell, home and each has a value
   uid    => '552', 
   shell  => '/bin/bash', 
   home   => '/home/vipin', 
}

One needs to keep in mind while declaring a resource, that it can be declared only once per config file. Repeating declaration of the same resource more than once will cause an error.

======================================

File resource:

The file resource manipulates files (also the content of files) and can manipulate directories as well.

file { "resolv.conf":
    ensure => present,
    path   => "/etc/resolv.conf",
    owner  => 'root',
    group  => 'system',
    mode   => 0644,
    source => 'puppet:///modules/base_aix_image/resolv.conf',
}

file { "/tmp/testfile":         <--if the file resource name contains the full path, then the path attribute is not needed
  ensure  => "present",
  owner   => "bb",
  group   => "bb",
  mode    => "0777",
  content => "Hello World\n",
}

Source parameter:
It is possible to download files from puppet master using the Puppet file server function. It is very useful when creating modules, so the configuration files, scripts which belongs to the module, can be organized nicely, and later we can use them in the file resource. (The directory structure of a module is described in detail in the Modules section.)

The Puppet file server is built into the Puppet master and in manifest files using the "source" parameter we can download, sync files which are stored remotely (on puppet master). 

source => "puppet://$::server/modules/sudo/etc/sudoers",
source => "puppet:///modules/sudo/etc/sudoers"

Both lines are doing the same. The $::server variable contains the hostname of our Puppet server. If the server name is not specified, then Puppet will use whatever server the client is currently connected to:


The first portion of this share is modules, which tells us that the file is stored in a module. Next we specify the name of the module the file is contained in, in this case ntp. Finally, we specify the path inside that module to find the file. All files in modules are stored under the files directory, so this is not mentioned in the path, only the file name. If there are any extra subdirectories, they work like youʼd expect, so you could have something like puppet:///modules/ntp/config_files/linux/ntp.conf.el.

======================================

Directories, Links:

We want to create a file and also want to make sure the directory exist:
file {'/tmp/test_dir':
  ensure => directory,
  mode => 0644,
}

file {'/tmp/test_file':
  ensure => file,
  content => "Hi.",
  require => File['/tmp/test_dir'],
}

file {'/tmp/test_link':
ensure => link,
target => '/tmp/test_file',
}

ensure => file     implies ensure => present, the resource should be a file, if not a file or does not exist, it will create a file.
ensure => present  just means that the resource should be a file, directory, or link; if it does not exist, it will create a file.

=========================================

Service resource

Service resources are used to make sure services are initialized and enabled. They are also used for service restart.

service { 'tomcat': 
   ensure => running, 
   enable => true 
}

===========================================

Package resource:

It makes sure the given packages is installed:

package { "telnet":
  ensure   => "installed",
}

If needed we can specify what is the type of the package (yum, rpm...), using the provider attribute:
 provider => yum

Remote package install:
Create a file let’s say telegraf.pp, to install an rpm from a remote source.

class remoterpm ( $src ) {

  package { 'package':
    provider         => 'rpm',
    ensure      => installed,
    source => "${remoterpm::src}"
  }
}

class { 'remoterpm':
  src => 'http://rpm.example.io/telegraf-1.4.3-1.x86_64.rpm',
}

You can then apply this class with:
puppet apply --debug --no-daemonize telegraf.pp


===========================================
===========================================
===========================================
===========================================
===========================================


Resource relationships

Between resources there are many times a sort of dependency. For example if we start a service, we need to be sure that the necessary package is already installed on the system for that specific service. To achieve this there are specific keywords (like require, before...).

For example, when we start the http service, we make sure the package is already installed:
package {'httpd':                              
  ensure => 'installed',
}

service {'httpd':
  ensure => running,
  require => Package['httpd'],   <--requires that package is installed (we refer to an already defined resource with capital letter ("P"))
}

These special keywords (like require) are called metaparameters, because they donʼt describe any feature of the resource, they only describe how Puppet should act.
These are the metaparameters which can be used on any resources: before, require, notify, subscribe

===========================

Before, Require:

Before and require make simple dependency relationships, where one resource must be synced before another. Before is used in the earlier resource, and lists resources that depend on it;
require is used in the later resource, and lists the resources that it depends on. 

before  <--a resource applied before the target resource. (it is used in the earlier resource and lists resources that depend on it)
require <--a resource applied after the target resource. (it is used in the later resource, and lists the resources that it depends on.)

In the above httpd example we used require, but it is possible to rewrite it using before, and to achieve the same end result: 
package {'httpd':                              
  ensure => 'installed',
  before => Service ['httpd']
}

service {'httpd':
  ensure => running,
}

===========================

Notify, Subscribe

The notify and subscribe metaparameters make dependency relationships the way before and require do, but they also make notification relationships. Not only will the earlier resource in the pair get synced first, but if Puppet makes any changes to that resource, it will send a refresh event to the later resource, which will react accordingly.

notify    <--a resource to be applied before the target resource. The target resource will refresh if the notifying resource changes.
subscribe <--a resource to be applied after the target resource. The subscribing resource will refresh if the target resource changes.

In this example, the sshd service will be restarted if Puppet has to edit its config file:
file { '/etc/ssh/sshd_config':
  ensure => file,
  mode => 600,
  source => 'puppet:///modules/ssh/sshd_config',
}

service { 'sshd':
  ensure => running,
  enable => true,
  subscribe => File['/etc/ssh/sshd_config'],
}

===========================

Package, file and service dependency:

Usually these 3 are dependent on each other, as files require package, service requires files and package:


 service {'httpd':                         <--define  a service and ensure it is running
   ensure => running,
   require => Package['httpd'],            <--the service requires the httpd package
 }

 package {'httpd':                         <--define the package 
   ensure => installed,
 }

 file {'/etc/httpd/virt.conf':             <--creating a conf file
   content => "<VirtualHost *:80>",
   require => Package['httpd'],            <--this file will be created after the httpd package is installed
   notify => Service['httpd'],             <--after conf file is created httpd service is restarted
 }

===========================

Chaining arrow

Similar relationships can be used, by  the characters -> and ~>
(it will show visually how things should happen in time.)

You can embed relationship information in a resource with the before, require, notify, and subscribe metaparameters.
You can also declare relationships outside a resource with the -> and ~> chaining arrow

-> (ordering arrow)          <-- Causes the resource on the left to be applied before the resource on the right.
~> (notification arrow)      <--Causes the resource on the left to be applied first, and sends a refresh event to the resource on the right if the left resource changes. 

An operand can be shared between two chaining statements, which allows you to link them together into a “timeline:”
Package['ntp'] -> File['/etc/ntp.conf'] ~> Service['ntpd']


2 ways of using these, both are doing the same:

file {'/tmp/test1':
  ensure => present,
  content => "Hi.",
}

notify {'after':
  message => '/tmp/test1 has already been synced.',
}

File['/tmp/test1'] -> Notify['after']

----------------

file {'/tmp/test1':
  ensure => present,
  content => "Hi.",
} ->
notify {'after':
  message => '/tmp/test1 has already been synced.',
}

===========================

Class relationships

The above mentioned metaparameters and chaining arrows are working with classes too.

For example the require function acts like include (so no include is needed for that specific class), but also causes the class to become a dependency of the surrounding container. Puppet will ensure that  foo is realized before bar, but doesn’t care if other resources are realized in between.

class bar {
  require foo
  notify { 'bar': }
}

class foo {
  notify { 'foo': }
}

include bar

-----------------------------------

chaining arrow:

class bar {
  notify { 'bar': }
}

class foo {
  notify { 'foo': }
}

class end {
  notify { 'end': }
}

class wrapper {
  class { 'foo': } ->
  class { 'bar': } ->
  class { 'end': }
}

include wrapper

}

===========================

Article 2

$
0
0
Class

A class is a code block in Puppet, which can be created in one place and invoked elsewhere. Using classes allows to reuse Puppet code. 
Defining a class makes it available by name, but doesnʼt automatically evaluate the code inside it. 
Declaring a class evaluates the code in the class, and applies all of its resources.

Defining a Class
Before you can use a class, you must define it, which is done with the class keyword (class names must start with a lowercase letters):
class unix { 
   file { 
      '/etc/passwd': 
      owner => 'superuser', 
      group => 'superuser', 
      mode => 644; 
   }  
   
   file {'/etc/shadow': 
      owner => 'vipin', 
      group => 'vipin', 
      mode => 440; 
   } 

Each class definition introduces a new variable scope. This means: Any variables you assign inside the class wonʼt be accessible by their short names outside the class; to get at them from elsewhere, you would have to use the fully-qualified name (e.g. $ntp::service_name)

You can assign new, local values to variable names that were already used at top scope. For example, you could specify a new local value for $fqdn.

Declaring a class
A class declaration occurs when a class is called in a manifest. A class declaration tells Puppet to evaluate the code within the class.  
A normal class declaration occurs when the "include" keyword is used:
include unix

This will cause Puppet to evaluate the code in our unix class. It has a limitation to include a single class only once.

The include function declares a class, if it hasnʼt already been declared somewhere else. If a class HAS already been declared, include will notice that and do nothing. This lets you safely declare a class in several places. If some class depends on something in another class, it can declare that class without worrying whether itʼs also being declared in site.pp.

--------------------------------------------------
Resource-like class declaration:
class {'ntp':}

This looks like a resource declaration, just with a resource type of "class". If Puppet tries to evaluate this and the class has already been declared, it will fail with a compilation error. (We can't declare same resource more than once.) However, unlike include, resource-like declarations let you specify class parameters.
--------------------------------------------------

=========================

Passing a parameter to a class:

To pass a parameter in a class, one can use the following construct:

class tomcat($version) { 
   ... class contents ... 
One key point to remember in Puppet is, classes with parameters are not added using the include function, rather the resulting class can be added as a definition.

node webserver { 
   class { tomcat: version => "1.2.12" } 
}
Default Values As Parameters in Class
class tomcat($version = "1.2.12",$home = "/var/www") { 
   ... class contents ... 

==========================
==========================
==========================

Module

Modules are just directories with files, arranged in a specific structure. Puppet looks for modules in a specific place, known as the modulepath (which is a configurable setting).
If a class is defined in a module, you can declare that class by name in any manifest, Puppet will automatically find and load the manifest that contains the class definition. The manifest files within a module have to obey certain naming restrictions.

This means you can have several modules (directories) with sophisticated Puppet code in them, and your site.pp manifest can look like this:
# /etc/puppetlabs/puppet/manifests/site.pp
include ntp
include apache
include mysql
include mongodb
include build_e

It is considered best practice to use modules to organize almost all of your Puppet manifests.

========================

The Modulepath

The modulepath is a set of directories that Puppet searches for module. The path to the location of modules on Master can be found in puppet.conf:

[main]
vardir = /var/opt/lib/pe-puppet
logdir = /var/log/pe-puppet
rundir = /var/run/pe-puppet
modulepath = /etc/puppetlabs/puppet/modules:/opt/puppet/share/puppet/modules


When using puppet apply, the modulepath parameter can be applied, so puppet will search modules in that path:
puppet apply --modulepath=/root/puppet/modules /root/puppet/site.pp

========================

Module Structure

A module has a definite structure which needs to be followed:
A module is a directory. The moduleʼs name must be the name of the directory. It contains a manifests directory, which can contain any number of .pp files, but it should always contain an init.pp file. This init.pp file must contain a single class definition and the classʼs name must be the same as the moduleʼs name. Each manifest in a module should contain exactly one class.  Each manifestʼs filename must map to the name of the class it contains.(In our module directory, the static files (for example a config file) should be in a directory called "files", and the dynamically changing files (like scripts with variables) should be in the directory called "templates".) 

Subdirectories in a module:
manifests    - Contains all of the manifests in the module.
files        - Contains static files, which managed nodes can download.
templates    - Contains templates, which can be referenced from the moduleʼs manifests.
lib          - Contains plugins, like custom facts and custom resource

We created a module called "ntp", with this structure:
/root/puppet
├── site.pp                      <--first entry point (in this example it contains only this 1 line: include ntp)
└── modules
   └── ntp                       <-- our module is called ntp, so all files related to it are in this ntp directory
       ├── files          <-- static files, like conf files which can be downloaded with puppet:///... (like ntp.conf.debian)      
       ├── manifests
       │   └── init.pp           <--this should contain our ntp class dfinition
       └── templates         <--.erb template files, content is dynamic with ruby code and variables (like ntp.conf.debian.erb)


Our init.pp looks like this:
# cat init.pp
class ntp {
  case $operatingsystem {
    centos, redhat: {
      $service_name = 'ntpd'
      $conf_file = 'ntp.conf.el'
    }
    debian, ubuntu: {
      $service_name = 'ntp'
      $conf_file = 'ntp.conf.debian'
    }
  }

  package { 'ntp':
    ensure => installed,
  }
  file { 'ntp.conf':
    path    => '/etc/ntp.conf',
    ensure  => file,
    require => Package['ntp'],
    #source  => "/root/ntp/${conf_file}"
    #source  => "puppet:///modules/ntp/${conf_file}",
    content => template("ntp/${conf_file}.erb"),
  }
  service { 'ntp':
    name => $service_name,
    ensure => running,
    enable => true,
    subscribe => File['ntp.conf'],
  }
}


We can run this module with puppet apply:
puppet apply --modulepath=/root/puppet/modules /root/puppet/site.pp
(or with verbose mode: puppet apply -v --modulepath=....)

The init.pp file is special, it always contains a class with the same name as the module. Every other file must contain a class with a name like this: <MODULE NAME>::<FILENAME>

So for example, if we had an apache module that contained a mod_passenger class, our file on disk would look like: apache/manifests/mod_passenger.pp
In mod_passenger.pp we would define the class like this: apache::mod_passenger

(if the file is inside a subdirectory of manifests/, it should be named: <MODULE NAME>::<SUBDIRECTORY NAME>::<FILENAME>)

----------------------------
installing 3rd party modules:
puppet module install puppetlabs-msql
puppet module list
----------------------------
========================

Templates

Templates are documents that contain a mixture of static and dynamic content. Puppet doesnʼt have its own templating language; instead, it uses ERB, a common Ruby-based template language. By using conditional logic and variables, they let you maintain one source document that can be rendered into any number of final documents. Templates are saved as files with the .erb extension, and should be stored in the "templates" directory of any module. There can be any number of subdirectories inside templates. 

To use a template, you have to render it to produce an output string. The "template" function takes a path to one or more template files and returns an output string:

file {'/etc/foo.conf':
  ensure => file,
  require => Package['foo'],
  content => template('foo/foo.conf.erb'),
}

The whole erb file what we use in templates dir, should be written that when we run it, it produces an output string. Then we can use this output string as the value of the content attribute. The template function expects file paths to be in a specific format: <MODULE NAME>/<FILENAME INSIDE TEMPLATES DIRECTORY>. That is, template('foo/foo.conf.erb') would point to the file /etc/puppet/modules/foo/templates/foo.conf.erb.


Templates are powerful because they have access to all of the Puppet variables that are present when the template is rendered. Facts, global variables, and local variables from the current scope are available to a template as Ruby instance variables — instead of Puppetʼs $ prefix, they have an @ prefix. (e.g. @fqdn, @memoryfree, @operatingsystem, etc.). Like: 
<%= @fqdn %>

Variables from other scopes can be accessed with the scope.lookupvar method, which takes a long variable name without the $ prefix. (For example, scope.lookupvar('apache::user')

------------------------------------
Here's an example of how to use inline_template in a manifest:
(inline_template is different from a template file)

cron { 'chkrootkit':
  command => '/usr/sbin/chkrootkit >
    /var/log/chkrootkit.log 2>&1',
  hour => inline_template('<%= @hostname.sum % 24 %>'),
  minute => '00',
}

Anything inside the string passed to inline_template is executed as if it were an ERB template. That is, anything inside the <%= and %> delimiters will be executed as Ruby code, and the rest will be treated as a string. In this example, we use inline_template to compute a different hour for this cron resource (a scheduled job) for each machine, so that the same job does not run at the same time on all machines.
------------------------------------

Article 1

$
0
0
Puppet

Puppet is a configuration management tool, which automates the configuration of servers. Puppet follows client-server model (Puppet Agents are connected to a Puppet Master), and agents are checking (by default every 30 mins) the status of the server, and if needed they download (pull) from master the necessary configuration (packages, files etc.)  Master can be run only on Linux and using port 8140. 


Definitions:
Declarative language: it describes the desired state of a server (instead of saying “run this command that starts a service,” it says  "ensure this service is running".)
Idempotency: if we implement it many times (eg. running a command many times) the state of the server will remain the same (adding a line to a file is not idempotent as the file will grow during runs)
Fact: Facts are details related to a node (fact can be a hostname, ip address, filenames etc.)
Catalog: Facts are compiled to catalogs. The agent uses catalogs to apply what is needed (install packages, create files..)
Manifest: a file with pp (puppet program) extension, which contains puppet code
Resource: anything which can be configured on a system, like a user, a specific file, a directory, a running service etc.
Resource type: similar resources can be grouped into types (like all existing users on a system belong to the user resource type)
Classes: a puppet code which contain multiple small operations working toward a single large goal can be organized into a class (like all ssh related things, would be called together the ssh class)
Modules:  collection of files or directories (such as manifests, class definitions), reusable and shareable units of puppet


==========================

Puppet agent/master:

Puppet master contains all the puppet code and definitions which are applied on every server where puppet agent is running. Puppet agent (on the client servers) runs as a service, and triggers a Puppet run at the configured time (usually every half an hour). Puppet agent does not have access to any manifests; instead, it requests a pre-compiled catalog from puppet master.

The Puppet master collects details (facts) of the target machine, then these are compared with the originally defined configuration details. After that Puppet master creates a catalog (a list which needs to be applied on the client) and sends it to the targeted Puppet agents. The Puppet agent then applies those configurations to get the system into a desired state. Finally, once one has the target node in a desired state, it sends a report back to the Puppet master.


==========================

Certificates

When the Puppet agent starts running at the first time, it generates a SSL certificate and sends it to the Puppet master which is going to manage it for signing and approval. Once the Puppet master approves the agent’s certificate signature request, it will be able to communicate and manage the agent node.


Signing a certificate:
1. puppet cert list          <--see all unsigned certificate requests  (does not sontain a + sign, so cert is not signed yet)
2. puppet cert sign <host>   <--will sign the certificate request from given host (host can be checked from the above output)
3. puppet cert sign --all    <--lists all certificates (signed and not signed, + means it is signed))

puppet cert clean <host>     <--removing a host from puppet

Master is the certificate authority for all agents. When agent tries to communicate with the master it checks if it has a signed certificate from the master, if not it generates a certificate request, sends it to the master, the master signs the certificate request and sends it back to the agent. The agent stores it and uses it for all future communications. Until master approves the certificate request, no communiaction will start between master and agent.

auto sign:
1. create file on master:
maintenance@puppet:/$ cat /etc/puppet/autosign.conf
*.mgmt.domain.com
*.svc.domain.com

2. restart services on master

===========================

Manifest

Puppet code is contained in files which are called manifests, and they have .pp extension. These files contain what we want to achieve (a service is running, a directory exists,  a user is not on the system anymore.)

An example manifest file which removes a user (/home/user-absent.pp):
user {'dave':
 ensure => absent,
}

To run it:
# puppet apply /home/user-absent.pp
Notice: Compiled catalog for aix_test.mydomain.org in environment production in 0.27 seconds
Notice: /Stage[main]/Main/User[dave]/ensure: removed
Notice: Finished catalog run in 0.48 seconds

We can have multiple manifest files which we can use at the same time, so they are not used directly when Puppet syncs resources:


Before being applied, manifests get compiled into a document called a “catalog,” which only contains resources and hints about the ordering to apply them. (In a master/agent Puppet environment agents can only see the catalog (and not the manifests)). By using this logic, manifests can be flexible and describe many systems at once. A catalog describes desired states for one system. (Agent nodes can only retrieve their own catalog)

site.pp is the main entry point (manifest) for the entire puppet network, this file is the main starting point for the catalog compilation (referred as site manifest)


===========================

Commands:

puppet help
puppet help resource

/etc/puppet/puppet.conf                   main configuration file
puppet config print                       lists puppet config parameters (config files, module path, users …)

facter                                    lists environment variables
facter <variable>                         lists only one variable
facter -p                                 see any facts that have been defined locally

puppet cert list                         shows you any pending requests generated by the agents
puppet cert list --all                    shows all the approved and pending certificate requests
puppet cert sign <FQDN>                   sign and approve the authentication request
puppet cert clean                         remove the existing certificate from the master
puppet cert generate                     generate certificate (by default it is not needed only in specific situations)

puppet resource --types                   list all default resource types that are available to Puppet
puppet resource user                     list all user resources on the server with attributes
puppet resource user <user>              lists attributes of given user
puppet resource user katie ensure=present shell="/bin/bash"   setting a new desired state for a resource
puppet resource user katie --edit         change a resource in text editor, after it is saved Puppet will modify that resource

puppet describe                          lists all of the associated attributes for Puppet resource types
puppet describe --list                    lists resources with some description (puppet resource --types, will lists only the names)
puppet describe -s <TYPE>                print short information about a type

puppet parser validate demouser.pp        verify the code is error free (shows if there are syntax errors)
puppet apply demouser.pp --noop           it shows what it would be done (it will not change anything, called smoke test)


Puppet agent -t is --test:
The --test option runs the Puppet client in the foreground, outputs to standard out, and exits after the run is complete. 
most common options used for testing. These are 'onetime', 'verbose', 'ignorecache', 'no-daemonize', 'no-usecacheonfailure', 'detailed-exitcodes', 'no-splay', and 'show_diff'.

puppet agent -tv --noop                  no operation mode (does not change anything on the client, it will show what Puppet would do, as a dry run)
puppet agent -tv                          apply configurations with verbose mode
Puppet agent -td                         apply configurations with debug mode

puppet apply -e 'notify {"Hello World": }'
puppet apply -e 'if "Puppet" == "puppet" { notify { "true!?": } }'

puppet apply <path to manifests file>     applying puppet code in the given manifest file
puppet apply --modulepath=/mnt/test /mnt/test/site.pp

puppet master --no-daemonize --verbose --debug     on Puppet master (we can see the results of the run, it is logged as well)

puppet module install puppetlabs-msql     install a specific module
puppet module list                        lists installed modules


===========================

Installing Puppet

Below method shows how to install puppet by using ruby and gems.
(It is good for opensource puppet, for enterprise may other method is needed.)

1. install ruby
(AIX is already configured to use yum, so ruby install is pretty simple.) 
# yum install ruby

2. install gems needed for puppet
# mkdir -p /etc/puppet /var/lib/puppet

# /opt/freeware/bin/gem install --no-rdoc --no-ri --version 2.5.1 facter
# /opt/freeware/bin/gem install --no-rdoc --no-ri --version 2.1.0 json_pure
# /opt/freeware/bin/gem install --no-rdoc --no-ri --version 1.3.4 hiera
# /opt/freeware/bin/gem install --no-rdoc --no-ri --version 3.8.7 puppet

3. create links for puppet commands
# ln -s /opt/freeware/lib64/ruby/gems/2.4.0/gems/puppet-3.8.7/bin/puppet /usr/bin/puppet
# ln -s /opt/freeware/lib64/ruby/gems/2.4.0/gems/facter-2.5.1/bin/facter /usr/bin/facter

4. fix some bugs/errors
Changing syck thing in YAML related ruby file:
# sed "s/$YAML_OLD/$YAML_NEW/g" $RUBY_FILE >$RUBY_FILE.new
# mv $RUBY_FILE.new $RUBY_FILE

for AIX 7.1 TL5 and 7.2 TL1 (and above) puppet chpasswd has a bug:
# sed '/(:chpasswd)/ s/, user//' $RUBY_CHPASSWD >RUBY_CHPASSWD.new
# mv RUBY_CHPASSWD.new $RUBY_CHPASSWD

5. after that puppet commands should work: 
# puppet --version

===========================

Visualizing resources into graphs (GraphViz):

1. generate dot files with puppet:
    - puppet apply --modulepath=/mnt/test /mnt/test/site.pp --noop --graph
    - 3 dot files will be under: /var/lib/puppet/state/graphs (expanded…, relationsh., resources)

2. copy dot files to mobaxterm:
    - first I copied to /mnt: cp /var/lib/puppet/state/graphs/*.dot /mnt
    - scp labuser@172.16.116.115:/migrate/*.dot .

3. convert dot files to graphs (png)
   /drives/c/_WORK/Tools/graphviz/bin/dot.exe -Tpng resources.dot -o resources.png
   /drives/c/_WORK/Tools/graphviz/bin/dot.exe -Tpng relationships.dot -o relationships.png
   /drives/c/_WORK/Tools/graphviz/bin/dot.exe -Tpng expanded_relationships.dot -o expanded_relationships.png


===========================

Linter:

Puppet also has a linter to enforce the style guide. It is called puppet-lint and can be installed from gems.
root@pro-puppet4:~#puppet-lint parent-scope.pp
ERROR: ssh::params not in autoload module layout on line 2
ERROR: ssh not in autoload module layout on line 10
WARNING: top-scope variable being used without an explicit namespace on line 12


===========================

Article 2

$
0
0
Facter

In Puppet, facter is a standalone tool that holds the environment level variables. In can be considered similar to env variable. In Puppet, the key-value pair is known as “fact”.  We can list what Facter knows about the system by using command: facter

# facter
...
...
facterversion => 3.14.9
filesystems => ext2,ext3,ext4,xfs
fips_enabled => false
hypervisors => {
  virtualbox => {
    revision => "136177",
    version => "6.1.4"
  }

is_virtual => true
kernel => Linux
kernelmajversion => 4.18
kernelrelease => 4.18.0-147.el8.x86_64
kernelversion => 4.18.0
...
...


Facter command can be used to list all the different environment variables and its associated values. These collection of facts comes with facter out-of-the-box and are referred to as core facts. One can add custom facts to the collection. Facter and facts are available throughout Puppet code as “global variable”, which means it can be used in the code at any point of time without any other reference.


file {'/tmp/userfile.txt': 
      ensure => file, 
      content => "the value for the 'OperatingSystem' fact is: $OperatingSystem \n", 
   } 

file{'motd':
  ensure  => file,
  path    => '/etc/motd',
  mode    => '0644',
  content => "IP address is ${ipaddress}, hostname is ${fqdn}. It is running ${operatingsystem} ${operatingsystemrelease} and Puppet ${puppetversion}",
}


===========================================


There are three types of fact that can be used and defined: Core Facts, Custom Facts, External Facts


Core Facts

Core facts are defined at the top level and accessible to all at any point in the code.

Just before an agent requests for a catalog from the master, the agent first compiles a complete list of information available in itself in the form of a key value pair. Facter data is treated as global variable. The facts are then available as top level variable and the Puppet master can use them to compile the Puppet catalog for the requesting agent. Facters are called in manifest as normal variable with $ prefix.

if ($OperatingSystem == "Linux") { 
   $message = "This machine OS is of the type $OperatingSystem \n" 
} else { 
   $message = "This machine is unknown \n" 

file { "/tmp/machineOperatingSystem.txt": 
   ensure => file, 
   content => "$message" 

[root@puppetagent1 /]# facter OperatingSystem 
Linux  

[root@puppetagent1 /]# puppet apply /tmp/ostype.pp 
Notice: Compiled catalog for puppetagent1.codingbee.dyndns.org 
in environment production in 0.07 seconds 
Notice: /Stage[main]/Main/File[/tmp/machineOperatingSystem.txt]/ensure: 
defined content as '{md5}f59dc5797d5402b1122c28c6da54d073' 
Notice: Finished catalog run in 0.04 seconds  

[root@puppetagent1 /]# cat /tmp/machinetype.txt 
This machine OS is of the type Linux


Custom Facts

Using the “export FACTER” Syntax one can manually add the facts using the export FACTER_{fact’s name} syntax.

Example:
[root@puppetagent1 facter]# export FACTER_tallest_mountain="Everest" 
[root@puppetagent1 facter]# facter tallest_mountain Everest


External Fact

On the agent machine, we need to create a directory as mentioned below.

$ mkdir -p /etc/facter/facts.d
Create a Shell script in the directory with the following content.

$ ls -l /etc/facter/facts.d 
total 4 
-rwxrwxrwx. 1 root root 65 Sep 18 13:11 external-factstest.sh 
$ cat /etc/facter/facts.d/external-factstest.sh 
#!/bin/bash 
echo "hostgroup = dev" 
echo "environment = development"
Change the permission of the script file.

$ chmod u+x /etc/facter/facts.d/external-facts.sh
Once done, we can now see the variable present with the key/value pair.

$ facter hostgroup 
dev 
$ facter environment 
development 

Article 1

$
0
0
Hiera

Hiera is a "Hierarchical Database" to store values for variables (key/value pair). It provides to Puppet a separation between the code and the data. With Hiera it is possible to write Puppet code, where the value for a variable will be searched in Hiera database and if it is found there our Puppet class will use that. Puppet classes can request whatever data they need, and your Hiera data will act like a site-wide config file. It makes our code easy to share and reuse, because the code and the data is separated.

Without Hiera our class would look like this:
class puppet::params {
 $puppetserver = "puppet.example.com"
}

Here we have a variable that will be needed somewhere else, and Hiera is a good place to keep these kind of variables. Hiera presents itself to Puppet as a function call and searches in special YAML or JSON files for the given variable. As an example one of our Hiera data file (written in YAML) could look like this:
puppetserver = 'puppet.example.com'

Then we can rewrite our puppet code like this:
class puppet::params {
 $puppetserver = hiera('puppetserver')
}

In this example Puppet will use the hiera function to get the string value 'puppet.example.com' and place it into the $puppetserver variable.

Hiera helps us to separate configuration from data. It helps us to create modules that are interchangeable blocks, so  the details of that configuration (the data) stays in Hiera data files and the logic of the module stays in the Puppet manifests.

==============================

Hiera installation

Hiera is usually installed on  Puppet Master server, it is optional and unnecessary on agent nodes.
(When I installed on CentOS puppet agent ( dnf install puppet-agent), after that I could use hiera as well.)

puppet resource package hiera ensure=install  <--installing hiera with Puppet
gem install hiera                             <--installing hiera using ruby

After installation the main Hiera config file hiera.yaml is available. This file lists how we want to use for store key-value pairs (YAML or JSON) and lists as well all the hierarchy levels from top to down, where hiera will search for the requested variables. (Each top-level key in the hash must be a Ruby symbol with a colon (:)

An example hiera.yaml file
(it is written version 3, later versions have other syntax)

---                                           <--these 3 dashes (---) show the start of the document
:backends:                                    <--lists how we want to store key-value pairs (yaml, json...),
  - yaml
:yaml:                                        <--for yaml we can set some configuration settings (like datadir...)
  :datadir: /etc/puppet/hieradata             <--the directory in which to find yaml data source files
:hierarchy:                                   <--lists how search should happen, in which order hierarchy levels are followed
  - "%{::fqdn}"                               <--these are the name of the files where data is stored (in this case like myhost.domain.com.yaml)
  - "%{::custom_location}"
  - common                                    <--the file name here will be common.yaml (/etc/puppet/hieradata/common.yaml)


These files in the hierarchy are called data sources, and they can be:
Static data source:  A hierarchy element without any variables used there (without any interpolation tokens). A static data source will be the same for every node. In the example above, "common" is a static data source, because a virtual machine named web01 and a physical machine named db01 would both use common.

Dynamic data source: A hierarchy element with at least one interpolation token (variable). If two nodes have different values for the variables it references, a dynamic data source will use two different data sources for those nodes. In the example above: the special $::fqdn Puppet variable has a unique value for every node. A machine named web01.example.com would have a data source named web01.example.com.yaml, while a machine named db01.example.com would have db01.example.com.yaml.

==============================

Backends

A Backend is that part of a computer system or application that is not directly accessed by the user. It is typically responsible for storing and manipulating data. In Hiera the backends are those files where the actual key-value pairs are stored. Hiera will search in these files and provides the data for the user.

The 2 main types which can be used are yaml and json. (It is possible to use other backends or write our own backends.) For each listed backends, the datadir is specified. This is the directory where our yaml (or json) files are stored (where the data source files are stored). It is possible to use variables (like %{variable}) with datadir, for example: /etc/puppet/hieradata/%{::environment}, so we can keep our production and development data separate.

------------------
Multiple Backends
We can specify multiple backends as an array in hiera.yaml. Hiera will give priority to the first backend, and will check every level of the hierarchy in it before moving on to the second backend.
For example in the following yaml fiel we use yaml and json backends (in this order):
---
:backends:
  - yaml
  - json
:yaml:
  :datadir: /etc/puppet/hieradata
:json:
  :datadir: /etc/puppet/hieradata
:hierarchy:
  - one
  - two
  - three

If we search for something in the hierarchy, then hiera will check files in this order:
one.yaml
two.yaml
three.yaml
one.json
two.json
three.json
------------------
==============================

Hierarchies

Hiera uses an ordered hierarchy to look up data, and this hierarchy is written in the hiera.yaml file. Each element in the hierarchy must be a string, which may or may not include variables (interpolation tokens). Hiera will treat each element in the hierarchy as the name of a data source.

For example:
:hierarchy: 
  - "%{::fqdn}"
  - common

Hiera uses Puppet facts (like fqdn) and if we use these facts as variables in the hierarchy definitions, then we can create separate yaml files (server1.yaml, server2.yaml... based on fqdn) with their own separate configuration values for each server (server 1 needs this package, server2 needs other package). Remove Puppetʼs $ (dollar sign) prefix when using its variables in Hiera. (That is, a variable called $::clientcert in Puppet is called ::clientcert in Hiera.) Puppet variables can be accessed by their short name or qualified name

Each element in the hierarchy resolves to the name of a data source(myhost.example.com.yaml, common.yaml). Hiera will check these data sources in order, starting with the first. If a data source in the hierarchy doesnʼt exist (the yaml file was deleted), Hiera will move on to the next data source. If a data source exists but does not have the piece of data Hiera is searching for, it will move on to the next data source (first checks myhost.examle.com.yaml, if data is not found it will check common.yaml). If a value is found in a normal (priority) lookup, Hiera will stop and return that value.  If Hiera goes through the entire hierarchy without finding a value, it will use the default value if one was provided, or fail with an error.

For example here the numbers show which data source (yaml file) is searched in which order:
(it shows the hierarchy levels from hiera.yaml and the facts, which are used during search for node db01.example.com)


So the final hierarchy in this example:
1. db01.example.com.yaml
2. development.yaml
3. common.yaml


(There are other search mechanisms, for example when Hiera will not stop at the first occurencce, but searches through all the hierarchy levels, and at the end combines the different values into an array. It is called the Array merge lookup method. And there is another method called Hash merge, which I never used.)

==============================

Data Sources (YAML, JSON)

YAML
The yaml backend looks for data sources on disk, in the directory specified in its :datadir setting. It expects each data source to be a text file containing valid YAML data, with a file extension of
.yaml. No other file extension (e.g. .yml) is allowed.

yaml data format examples:

---
# array
apache-packages:
  - apache2
  - apache2-common
  - apache2-utils

# string
apache-service: apache2

# interpolated facter variable
hosts_entry: "sandbox.%{fqdn}"

# hash
sshd_settings:
root_allowed: "no"
password_allowed: "yes"

# alternate hash notation
sshd_settings: {root_allowed: "no", password_allowed: "yes"}

# to return "true" or "false"
sshd_settings: {root_allowed: no, password_allowed: yes

-------------------------------

JSON


The json backend looks for data sources on disk, in the directory specified in its :datadir setting. It expects each data source to be a text file containing valid JSON data, with a file extension of
.json. No other file extension is allowed.

json data format examples:

{
"apache-packages" : [
"apache2",
"apache2-common",
"apache2-utils"
],

"hosts_entry" : "sandbox.%{fqdn}",

"sshd_settings" : {
    "root_allowed" : "no",
    "password_allowed" : "no"
  }
}

===============================

Commands:

puppet lookup <variable>                       it will search for the given variable

hiera <variable>                               search for the given variable in hiera
   -c <yaml conf file>                         path to an alternate hiera.yaml file
   -d                                         debug mode

hiera my_var ::fqdn=localhost.localdomain      searching for variable (my_var) in hierarchy level, where ::fqdn is mentioned in hiera.yaml file
$gccs = hiera('gcc::versions', undef)         in puppet code a variable can get a value using hiera (if hiera does not find variable, it wll get undef value)


===============================

My test setup

hiera config file:
# cat hiera.yaml
---
:backends:
  - yaml
:yaml:
  :datadir: /root/hieradata
:hierarchy:
  - "node/%{::fqdn}"
  - "osfamily/%{osfamily}"
  - common

(I checked with facter what is current fqdn and it showd localhost.localdomain so I created that yaml file.)

directory and file structure:
/root/hieradata
├── node
│   └── localhost.localdomain.yaml
├── osfamily
│   ├── Debian.yaml
│   └── RedHat.yaml
└── common.yaml


content of yaml files:
# cat localhost.localdomain.yaml
my_var: node
gcc_version:
 - '6.4.0'
 - '8.3.0'
 - '9.1.0'

# cat Debian.yaml
"tools::working_dir" : "/opt/debian"
my_var: debian

# cat RedHat.yaml
"tools::working_dir" : "/opt/redhat"

# cat common.yaml
my_var: common


Test results searching for variable: my_var

# hiera my_var                                    <--without any specification it will be found in common.yaml
common

# hiera -d my_var ::fqdn=localhost.localdomain    <--with debug mode and specifying where to look
DEBUG: 2020-03-20 17:41:17 +0100: Hiera YAML backend starting
DEBUG: 2020-03-20 17:41:17 +0100: Looking up my_var in YAML backend
DEBUG: 2020-03-20 17:41:17 +0100: Looking for data source node/localhost.localdomain
DEBUG: 2020-03-20 17:41:17 +0100: Found my_var in node/localhost.localdomain
node

# hiera my_var osfamily=Debian                   <--specifying in osfamily which yaml file to check
debian

# hiera my_var osfamily=RedHat                   <--same as above, but in RedHat.yaml my_var is missing, found in common.yaml
common

# hiera tools::working_dir osfamily=Debian       <--checking a value os a variable in a class
/opt/debian

# hiera unknon_var                               <--if variable does not exit
nil

# hiera unknon_var 1111                           <--if variable does not exist give a default value to it
1111


================================


Article 1

$
0
0
RSCT (Reliable Scalable Cluster Technology)

RSCT  (as its name says) is a sort of Cluster Technology. It comes with AIX by default (no additional installation is needed) and it consists of several low-level components (daemons, subsystems). These components create a basic cluster environment (with nodes and heartbeat between these nodes etc.) which is monitored by RSCT. If a node crashes an event is generated and RSCT informs the RSCT-aware client. (PowerHA, or more precisely the cluster manager (clstrmgrES) is itself an RSCT-aware client). Historically RSCT was a separate product, but starting with AIX 5.1 it is shipped with the operating system. On AIX 7.2 the actual RSCT fileset version is 3.2. It is possible to check/remove the RSCT filesets (lslpp ...), and as a comparison to CAA, CAA is built into AIX so inherently, that there are no separate CAA filesets available.

The key point here is that RSCT provides services, such as cluster monitoring, which is used by PowerHA and PowerHA provides "high availability services" to applications. For example, responding to an unexpected event, it is necessary to know when it occurs. This is the job of the RSCT to monitor for certain failure. Beside PowerHA, RSCT-aware clients are GPFS, SSP or the HMC too.

RSCT’s role in a PowerHA cluster is to provide:
- Failure detection and diagnosis for topology components (nodes, networks, and network adapters)
- Notification to the cluster manager of events
- Coordination of the recovery actions (fallovers, fallbacks and dealing with individual NIC failures by moving or swapping IP addresses)

We can use the ctversion command to finnd out which version of RSCT is running on a particular AIX (or lslpp):
# /opt/rsct/install/bin/ctversion


==================================

RSCT components


The main RSCT components are:
Resource:  A resource is the fundamental concept of the RSCT architecture; it is an instance of a physical or logical entity. Examples of resources include lv01 on node A, Ethernet device en0 on node B, and IP address 9.117.7.21. A set of resources that have similar characteristics is called a resource class.

Resource Monitoring and Control (RMC): This is the main component in RSCT. It creates events based on the messages recived from the Resource Managers, then client programs can use these event notifications to trigger recovery actions. It also coordinates between the various RSCT components.

RSCT resource managers: Resource Managers are software layers between a resource (for example a filesystem) and RMC. They are making the actual commands for each resource and based on the configuration they decide how the system should react to specific events. For example there are File System Resource Manager, Host Resource Manager, Audit Log Resource Manager, Event Response Resource Manger ...

RSCT  security services: This provides the security infrastructure that enables RSCT components to authenticate. (These days only RMC and the Resource Managers are using the RSCT security services)

Group Services:  This subsystem is responsible for coordinating and monitoring changes across all cluster nodes and ensures all of them finished properly. In a PowerHA setup, from Group Services point of view the "application running on multiple nodes" is the cluster manager (clstrmgrES). Group Services reports failures to the Cluster Manager as soon the Topology Services informs it. (On PowerHA 7.1 CAA informs the Group Services). Then the Cluster Manager makes cluster-wide coordinated responses to the failure. (The PowerHA cluster manager is an RSCT client and it registers itself with both the RSCT RMC Manager and the RSCT Group Services components. After an event has been reported to the PowerHA Cluster Manager, it responds to this event with recovery commands and event scripts. These scripts are coordinated via the RSCT group services component.)

Topology Services: This provides node and network monitoring and failure detection (heartbeats). It is responsible for building heartbeat rings for the purpose of detecting and reporting importsnt informations to the RSCT Group Services, which in turn reports them to the Cluster Manger.  In the heartbeat ring, each Topology Services daemon sends a heartbeat message to one of its neighbors and expects to receive a heartbeat from another. In this system of heartbeat messages, each member monitors one of its neighbors. If the neighbor stops responding, the member that is monitoring it will send a message to the "group leader". Topology Services is also responsible for the transmission of any RSCT-related messages between cluster nodes. After PowerHA 7.1.0, the RSCT topology service is deactivated and all its functions are performed by CAA topology services.

==================================

RSCT domains

RSCT can provide 2 types of "clusters", which are called in RSCT terminology: domains. Depending on the status of the nodes (if all of them are on equal level or if there is a special control node between them) these 2 RSCT domains exist: management domain and peer domain.

Management Domain: (set of nodes that is configured for manageability or monitoring)
An RSCT management domain is a set of nodes that can be managed and monitored from one of the nodes, which is designated as the management control point (MCP). Except the MCP all other nodes are considered to be managed nodes. Topology Services and Group Services are not used in a management domain.

Peer Domain: (set of nodes that is configured for high availability)
An RSCT peer domain is a set of nodes that have a knowledge of each other, and they share resources between each other. On each node within the peer domain, RMC depends on Topology Services, Group Services, and cluster security services.  If PowerHA V7 is installed, Topology Services are not used, and CAA is used instead. 

In order to understand how various RSCT components are used in a cluster, we need to keep in mind that nodes of a cluster can be configured for manageability, high availability or both.

Combination of management and peer domains
We can have a combination of management domains and peer domains. This example shows one Hardware Management Console (HMC) that is managing three LPARS. The HMC and Node A, Node B and NodeC are creating a Management Domain. Additionally on Node B an d on Node C PowerHA is installed, so these 2 nodes are making a peer domain too. In a Power Systems environment, the HMC is always the management server (MCP) in the RSCT management domain. LPARs are automatically configured as managed nodes.


==================================

RSCT and CAA


Cluster Aware AIX (CAA) introduces clustering capabilities to AIX (setup of a cluster, detecting the state of nodes and interfaces). When RSCT operates on nodes in a CAA cluster, a peer domain is created that is equivalent to the CAA cluster, and can be used to manage the cluster by using peer domain commands. 

Only one CAA cluster can be defined on a set of nodes. Therefore, if a CAA cluster is defined then the peer domain that represents it is the only peer domain which can exist there. If no CAA cluster is configured, then existing and new peer domains can also be used. 

A CAA cluster and the equivalent RSCT peer domain operate hand in hand such that a change made to the CAA cluster by using CAA commands, is reflected automatically in the corresponding peer domain; similarly the existing peer domain commands result in equivalent changes to the CAA cluster. So, for example, when you create a CAA cluster by using mkcluster command, the equivalent peer domain also gets created, the same way if we used the mkrpdomain RSCT command. Similarly node add and delete operations that use either peer domain or cluster commands are applied to both the CAA cluster and the peer domain.

Starting with RSCT version 3.1.0.0, the Group Services subsystem can operate in a Cluster Aware AIX (CAA) environment. In this environment, Group Services rely on the CAA to provide node and adapter liveness information and node-to-node communication, thus removing its dependency on RSCT Topology Services. Instead of connecting to the Topology Services daemon, it gets information directly from the low-level cluster services in the CAA environment.

RSCT version 3.1.2.0, or later, can be installed on the nodes and can coexist with prior RSCT releases. Because CAA delivers fundamental node and interface liveness information, the Topology Services subsystem is not active in a peer domain based on CAA. 

===========================

PowerHA, RSCT and CAA

When a PowerHA cluster is configured and synchronized, 3 different layers will work together in a coordinated way: PowerHA, RSCT and CAA.  We need to configure PowerHA only, and it will take care about the other 2 layers (RSCT and CAA). In traditional situations, there is no need to use CAA or RSCT commands at all, because they are all managed by PowerHA.  

To check whether the services of each layer are up, we can use different commands, like clmgr, lsrpdomain, and lscluster.


Cheking if PowerHA is running:
# clmgr -a state query cluster
STATE="STABLE“

Checking whether RSCT is running:
# lsrpdomain
Name              OpState RSCTActiveVersion MixedVersions TSPort GSPort
CL1_N1_cluster    Online  3.1.5.0           Yes           12347  12348

To check whether CAA is running:
# lscluster -m | egrep "Node name|State of node"
 Node name: powerha-c2n1
 State of node: UP
 Node name: powerha-c2n2
 State of node: UP NODE_LOCAL

If we stop PowerHA, then clmgr command will show "OFFLINE", but RSCT and CAA commands will still show that their services are running. CAA and RSCT are stopped and started together. By default, CAA and RSCT are automatically started as part of an operating system restart (if the system is configured by PowerHA). There are situations when we need to stop all three cluster components, for example, when we must change the RSCT or CAA software. 

For example, to stop all cluster components, use: clmgr off cluster STOP_CAA=yes

Then the status of each service will be:
# clmgr -a state query cluster
STATE="OFFLINE“

# lsrpdomain
Name              OpState RSCTActiveVersion MixedVersions TSPort GSPort
CL1_N1_cluster    Offline 3.1.5.0           Yes           12347  12348

# lscluster -m
lscluster: Cluster services are not active on this node because it has been
stopped.

The information when CAA is stopped manually is preserved across reboots. So, if you want to start PowerHA on a node where CAA and RSCT were stopped manually, you must use the START_CAA argument.

Starting with AIX 7.1 TL4 or AIX 7.2, we can use the clctrl command to stop or start CAA and RSCT.
clctrl -stop: stop CAA, RSCT and it will stop PowerHA too
clctrl -start: start CAA and RSCT. It will not start PowerHA, to start it use the clmgr or smitty

===========================

Article 3

$
0
0
NFS

PowerHA provides highly available NFS services, which allows the backup NFS server to recover the current NFS activity if the primary NFS server fails. This feature is available only for two-node clusters when using NFSv2/NFSv3, and more than two nodes when using NFSv4. If NFS exports are defined through PowerHA, all NFS exports must be controlled by PowerHA. AIX and PowerHA NFS exports cannot be mixed. NFS information is kept in /usr/es/sbin/cluster/etc/exports, which has the same format as the AIX exports file (/etc/exports).

When configuring NFS through PowerHA, you can control these items:
- The network that PowerHA will use for NFS mounting.
- NFS exports and mounts at the directory level.
- the field “file systems mounted before IP configured” must be set to true (this prevents client access before needed)
- default is to export filesystems rw to the world, in /usr/es/sbin/cluster/etc/exports you can control that


-------------------------------------------
  
NFS cross-mounts

By default, NFS exported file systems, will automatically be cross-mounted (so each node will be an NFS client). This means, that the node that is hosting the resource group mounts the file systems locally, NFS exports them, and NFS mounts them (This node becomes NFS server and NFS client at the same time.) All other nodes of the resource group simply NFS-mount the file systems, thus becoming NFS clients. If the resource group is acquired by another node, that node mounts the file system locally and NFS exports them, thus becoming the new NFS server.

Syntax for configuration: /a; /fsa (/a: local mount point; /fsa: exported dir)

For example:
Node1 with service IP label svc1 will locally mount /fsa and NFS exports it.
Node1 will also NFS-mount svc1:/fsa on /a
Node2 will NFS-mount svc1:/fsa on /a

-------------------------------------------

NFS tiebreaker

When we use a linked cluster (where the cluster nodes are located at different geographical sites), there is an option to use a tiebreaker disk or NFS tiebreaker.

A cluster split event splits the cluster into two (or more) partitions, each of them containing one or more cluster nodes. The resulting situation is commonly referred to as a split-brain situation. In a split-brain situation, the two partitions have no knowledge of each other’s status, each of them considering the other as being offline. As a consequence, each partition tries to bring online the other partition’s resource groups (RGs), thus generating a high risk of data corruption.

When a split-brain situation occurs, each partition attempts to acquire the tiebreaker by placing a lock on the tiebreaker disk or on the NFS file. The partition that first locks the SCSI disk or reserves the NFS file wins, and the other loses. All nodes in the winning partition continue to process cluster events, and all nodes in the losing partition attempt to recover according to the defined split and merge policies. (most probably restarting the cluster services)

-------------------------------------------


Article 2

$
0
0

Resource, Resource Group 

Resources: File systems, service IPs, applications... which are highly available (These can be moved from one node to another.)
Resource Group (RG): Those resources which are grouped together, and moved together during a failover
Default node priority: The order in which the nodes are defined in the RG. A RG with default attributes will move from node to node in this order as each node fails.
Home node: The highest priority node in the default node list. RG will initially be activated there. (It is not the node where the RG is currently active on.)
Fallover: The process of moving a RG that is online on one node to another node in the cluster in response to an event.
Fallback: The process of moving a RG that is currently online on a node that is not its home node, to a re-integrating node.
Node failure: If a node fails, the RGs that were active on that node are distributed among the other nodes in the cluster, depending on their fallover policies.
Node recovery: When a node recovers and is reintegrated into the cluster, RGs can be reacquired depending on their fallback policies.

------------------------------------

Resource group (RG)

Resource groups allow PowerHA to manage resources as a single entity. For example, an application can consist of start and stop scripts, a database, and an IP address. These resources are then included in a resource group for PowerHA to control as a single entity. PowerHA ensures that resource groups remain highly available by moving them from node to node.

Resource group states:
- Online: The RG is currently operating properly on one or more nodes in the cluster.
- Offline: The RG is not operating and currently not in error condition (the user may requested this state or dependencies were not met)
- Acquiring: A RG is currently coming up on a node. In normal conditions status changes to Online.
- Releasing: The RG is in the process of being released (going down). In normal conditions after released, the status changes to offline.
- Error: The resource group has reported an error condition. User interaction is required.
- Unknown: The RG’s current status cannot be obtained, possibly because of loss of communication, or a resource group dependency is not met...

Each node that joins the cluster automatically attempts to bring online any of the resource groups that are in the ERROR state.

Start up options:
- Online on home node only: The RG is brought online when its home node joins the cluster. If home node isn't available, it stays offline
- Online on first available node: The RG is brought online when the first node in its node list joins the cluster.
- Online on all available nodes: The RG is brought online on all nodes in its node list as they join the cluster.
- Online using distribution policy: The RG is brought online only if the node has no other resource group of this type already online.

Fallover options:
- Fall over to next priority node in list: The RG falls over to the next node in the resource group node list.
- Fallover using dynamic node priority: The RG will be aquired by that node which has for example most free memory, most free cpu...user script is also possible
- Bring offline, on error node only: The RG is brought offline in the event of an error. This option is designed for RGs that are online on all available nodes.

Fallback options: (when a node joins back the cluster)
- Fall back to higher priority node in list: The RG falls back to a higher priority node when it joins the cluster.
- Never fall back: The RG does not move if a high priority node joins the cluster. RGs with online on all available nodes must be configured with this option.

------------------------------------

Resource Group attributes during Startup,Fallover,Fallback


Settling time
If a RG has the setting of "online on first available node", settling time ensures that a RG does not start on an early integrated node that is low in its priority list, then keep falling over to higher priority nodes as they integrate.  If the settling time is set for a resource group and the node that integrates into the cluster is its highest priority node then it goes online immediately, otherwise it waits the settling time to see if another higher priority node joins.

Delayed fallback timers
Configures the frequency for a fallback operation, which can be daily, weekly, monthly, yearly. Fallback will happen at the configured time.

Distribution policy
This node-based distribution policy ensures that on cluster startup, each node will acquire only one resource group with this policy set.

Resource group processing order
If a node is attempting to bring more than one resource group online, the default behavior is to merge all the resources into one large resource group and then process them as one “resource group.” This is called parallel processing, although it is not true parallel processing because it is single thread. This default behavior can be altered and serial processing can be specified for particular resource groups by specifying a serial acquisition list. This order defines only the order of processing on a particular node, not across nodes. If serial processing is set, the specified RGs are processed in order, RGs containing only NFS mounts are processed in parallel. The reverse order is used on release.

------------------------------------

Resource group dependencies

An example for RG dependencies, when a database must be online before the application server is started. If the database goes down and falls over to a different node, the RG that contains the application server will also be brought down and back up on any of the available cluster nodes. If the fallover of the database RG is not successful, then both RGs (database and application) will be put offline.

Resource group dependencies (combination of two out of three types of RG dependency can be set):
- Parent/child dependency: a RG cannot be started until a particular RG is already active
- Location dependency: certain RGs will be always online on the same node or on different nodes
- Start/stop after dependency: similar to parent/child dependency, but based on the setting during start or stop RGs can be processed together


Parent/Child dependency:
A parent/child dependency allows binding resource groups in a hierarchical manner.  A child resource group depends on a parent resource group. The parent resource group must be online before any of its children can be brought online. If the parent resource group is to be taken offline, the children must be taken offline first. There can be only three levels of dependency for resource groups. A resource group can act both as a parent and a child. You cannot specify circular dependencies among resource groups. It is important to have startup application monitors for the parents. After the startup application monitor confirmed that the application has successfully started, the processing of the child resource groups can then continue.

Location dependency
It ensure that RGs will always be online on the same node or on different nodes (or sites).
- Online on same node: A RG can be brought online on the node where other RGs in the same set are already online
- Online on different nodes: The specified RGs will be distributed on different nodes.
- Online on same site: A RG can only be brought online on a site where other RGs with this dependency are currently in an online state

Start/Stop after dependency
- Start after dependency: The target RG must be online before a source (dependent) RG can be activated. There is no dependency when releasing RGs, they are released in parallel.
- Stop after dependency: Te target RG must be offline before a source (dependent) RG can be brought offline. There is no dependency when acquiring RGs and they are acquired in parallel.

Set or display the RG dependencies (clrgdependency):
# clrgdependency -t [PARENT_CHILD | NODECOLLOCATION | ANTICOLLOCATION |SITECOLLOCATION ] -sl
# clrgdependency -t PARENT_CHILD -sl
#Parent Child
rg1 rg2
rg1 rg3

Another way to check is by using the odmget HACMPrg_loc_dependency command.

------------------------------------

Article 1

$
0
0

SMUI (System Mirror User Interface)

PowerHA V7.2 includes a browser-based GUI to monitor cluster environments, which is called PowerHA SMUI.

SMUI provides following functions:
- Monitors the status for all clusters, sites, nodes, and RGs in your environment.
- Scans event summaries and reads a detailed description for each event.
- Searches and compares log files. We can search in hacmp.out, cluster.log, clstrmgr.debug, syslog,caa....T
- View properties for a cluster (version, node names, repository disk information)
- We can create zones to split clusters by geographical location, by business areas etc..
- With the Health Summary, the health of our cluster is visualized

====================================

Installation:

SMUI clients: A node that is part of an AIX or Linux PowerHA cluster.
SMUI server: A server running Linux or AIX that provides SMUI.

Although the SMUI server can be a cluster node, it a best practice to place it on a separate stand-alone AIX or Linux system. Also, ideally the SMUI server must have internet access to download more open source packages as required.

Packages installed on SMUI server:
  cluster.es.smui.common 7.2.3.0
  cluster.es.smui.server 7.2.3.0


Packages installedon SMUI client (PowerHA nodes):
  cluster.es.smui.agent 7.2.3.0
  cluster.es.smui.common 7.2.3.0

Then folllowed this:

#######################################################################
#######################################################################
##
##  The IBM PowerHA SystemMirror for AIX graphical user interface
##  (GUI) server installation is starting. To complete the process,
##  you must install additional files when the installation completes.
##  These additional files were not included in the server fileset
##  because they are licensed under the General Public License (GPL).
##  However, they are necessary in order for the GUI server to run.
##  You can automatically download the required files by running the
##  following script:
##
##      /usr/es/sbin/cluster/ui/server/bin/smuiinst.ksh
##
##  If smuiinst.ksh is behind a firewall, but you have a proxy, the
##  "-p" flag can be used to specify an HTTP proxy (the "http_proxy"
##  environment variable is also honored). Run "smuiinst.ksh -h -v"
##  to get more information.
##
##  If no proxy is available, the smuiinst.ksh script can be copied
##  to a system outside of the firewall and used from there to
##  download the needed files (using the "-d" flag). Those files can
##  then be transferred to the GUI server system and installed using
##  "smuiinst.ksh -i". Note that the external system does not have to
##  be AIX-based, but must have basic UNIX tools support, along with
##  PERL 5.
##
##  This is a one-time only setup procedure. Once it is done, it will
##  not need to be repeated.
##
#######################################################################
#######################################################################

I installed these manually with yum (not these versions but higher versions)
        "info-4.13-3.aix5.3.ppc.rpm" is partially downloaded.
        "cpio-2.11-2.aix6.1.ppc.rpm" appears to be downloaded already.
        "readline-6.2-2.aix5.3.ppc.rpm" is partially downloaded.
        "libiconv-1.13.1-2.aix5.3.ppc.rpm" is partially downloaded.
        "bash-4.2-5.aix5.3.ppc.rpm" is partially downloaded.
        "gettext-0.17-6.aix5.3.ppc.rpm" is partially downloaded.
        "libgcc-4.9.2-1.aix6.1.ppc.rpm" is partially downloaded.
        "libgcc-4.9.2-1.aix7.1.ppc.rpm" is partially downloaded.
        "libstdc++-4.9.2-1.aix6.1.ppc.rpm" is partially downloaded.
        "libstdc++-4.9.2-1.aix7.1.ppc.rpm" needs to be retrieved.


libgcc, libstdc can be downloaded from http://www.bullfreeware.com/pkg?id=2289

Tried this as well: /usr/es/sbin/cluster/ui/server/bin/smuiinst.ksh -i /home/labuser
After the installation completed successfully, opened a web browser and used this URL (IP is the address where SMUI is installed): https://10.10.42.47:8080/#/login

After login first I had to create zone then add cluster to that zone using hostname.....

====================================

Article 1

$
0
0
PowerVC Upgrade/Install

Basically these are the same, the same install script is used for both.

0. Backup
  - vmware snapshot


1. Red Hat update if needed (for PowerVC 1.4.4 minimum RHEL 7.7. is needed):
   # cat /etc/redhat-release
  Red Hat Enterprise Linux Server release 7.6 (Maipo)

  # sudo yum check-update
  # sudo yum update -y
  # sudo shutdown -r now

  Updating to a specific release with "releasever" parameter:
  (system should be registered with subscription manager, if releasever is not specified, system will be updated to latest major release)
  # yum --releasever=7.7 update


2. PowerVC  Install/Upgrade
  - download tgz (from ESS)
  - copy to PowerVC node and
  - as root:
  # tar -vzxf …
  # cd <local directory>/powervc-1.4.4.0/
  # ./install

  Upgrade/Install complained about these missing prerequisites:
  - missing python packages: # yum install python-fpconst-0.7.3-12.el7.noarch.rpm python-twisted-core-12.2.0-4.el7.x86_64.rpm python-twisted-web-12.1.0-5.el7_2.x86_64.rpm python-webob-1.2.3-7.el7.noarch.rpm python-webtest-1.3.4-6.el7.noarch.rpm python-zope-interface-4.0.5-4.el7.x86_64.rpm SOAPpy-0.11.6-17.el7.noarch.rpm
  - disabling epel repository: # /usr/bin/yum-config-manager --disable epel
  - disabling ipv6 kernel module: # export ERL_EPMD_ADDRESS=::ffff:127.0.1.1
  - disabling IPv6 entirely: export EGO_ENABLE_SUPPORT_IPV6=N

  If everything is fine, it will do the upgrade… ask license, firewall questions etc, logs can be checked in /opt/ibm/powervc/log
  (as I saw during upgrade it uninstalled current PowerVC, then did a new installation.)
  # if it is a new installation it will ask edition: Standard, Cloud PowerVC Manager
  # License text --> press  1 and  Enter
  # Do you want the IBM PowerVC setup to configure the firewall? 1-Yes or 2-No? 2
  # Continue with the installation: 1-Yes or 2-No? 1


It will take long (about an hour) until it is finished and output will show something like this:
...
...
...
Installation task 7 of 7

Done with cleanup actions.

The validation of IBM PowerVC services post install was successful.

************************************************************
IBM PowerVC installation successfully completed at 2020-01-22T17:41:07+01:00.
Refer to /opt/ibm/powervc/log/powervc_install_2020-01-22-170753.log for more details.

Use a web browser to access IBM PowerVC at
https://powervc.lab.domain.org

Firewall configuration may be required to use PowerVC.
Refer to the Knowledge Center topic 'Ports used by PowerVC'.

************************************************************


================================


Removing and adding back SSP to PowerVC

Once PowerVC behaved strangely when Image or Volumes were created (it was hanging, new items did not show up) and IBM recommendation was to remove SSP from PowerVC then adding back should help. (Below steps will not delete data from SSP, the volumes and all data in SSP will remain there, these will be removed from PowerVC only.)


1.Backup PowerVC
  - powervc-backup: https://www.ibm.com/support/knowledgecenter/en/SSXK2N_1.4.3/com.ibm.powervc.standard.help.doc/powervc_backup_data_hmc.html

2.in PowerVC UI record details (print screen)
  - each network: name,vlan id, subnet mask, dns,ip range, SEA mappings , SR-IOV mappings
  - each host: display name, management server (hmc or novalink name), DRO options, Remote restart value
  - each image in SSP: name of the image, OS type, version, details of each VOLUME in that image: volume details, wwn, storage provider name, storage id name etc.
  - export images to file from SSP:
     # cd /var/vio/SSP/SSP_Cluster_1/D_E_F_A_U_L_T_061310/IM
     # dd if=volume-Image_AIX-72_TMP_volume_1-61475a18-3726.fdb060e56143f9e7408e2ffe78de92ea of=/backup/powervc_image_dd/AIX-61_TMP bs=1M


Next steps will impact powervc management - NO impact on running VMs or systems

3.Unmanage all VMs and Hosts 
  - in Virtual Machines: unmanage each VM
  - in Hosts: "remove host" on each host which uses the SSP
  - confirm SSP no longer exists in storage view of PowerVC UI

4. Remove HMC
  - record details of HMC: hmc name and ip, user id, password
  - from hosts view of PowerVC click on the HMC connections tab, remove the HMC which had hosted the SSP

VMs, Hosts, Storage and Images have been removed from PowerVC, next steps will rebuild the environment.

5. Add back HMC and hosts
  - in Hosts view, HMC connections tab, click add HMC: enter hmc name, ip , user and password
  - in Hosts view, add host, leave hmc as connection type, select HMC addeded above
  - Select to add all hosts

6. Confirm SSP was added back to PowerVC
  - in storage view SSP should exist again

7. Create networks (if needed)
  - adding hosts will "discover" networks defined, any manually created networks may be recreated.

8. Recreating images (https://www.ibm.com/support/knowledgecenter/en/SSXK2N_1.4.3/com.ibm.powervc.standard.help.doc/powervc_manually_import_export_volumes_hmc.html)
  - PowerVC cannot "discover" the old images that existed, the volumes from those images remain in the SSP
     To import the volume from a file to SSP:
     # create a volume
     # cd /var/vio/SSP/SSP_Cluster_1/D_E_F_A_U_L_T_061310/VOL1
     dd if=/backup/powervc_image_dd/AIX-61_TMP of=volume-AIX-61_TMP-ci-4043e86a-8e35.5249022804b1cebcc0bbf569fd2b5bd3 bs=1M

9. Validate the environment

================================

Article 1

$
0
0
HMC Install, Config

HMC network types:

HMC has 2 different networks:
- private network: for accessing/managing Power servers through the FSP
- open network: this network used for user logins, and each LPAR is doing DLPAR operations through this network

Private networks

The only devices on the HMC private network are the HMC itself and each of the managed systems to which that HMC is connected. The HMC is connected to each managed system's FSP (Flexible Service Processor). On most systems, the FSP provides two Ethernet ports labeled HMC1 and HMC2. This allows you to connect up to two HMCs.


This figure shows a redundant HMC environment with two managed systems. The "blue" HMC is connected to the first port on each FSP, and the "red" (redundant) HMC is connected to the second port. Each HMC is configured as a DHCP server, using a different range of IP addresses. The connections are on separate private networks. As such, it is important to ensure that no FSP port is connected to more than one HMC.

Each managed system's FSP port that is connected to an HMC requires a unique IP address. To ensure that each FSP has a unique IP address, use the HMC's built-in DHCP server capability. When the FSP detects the active network link, it issues a broadcast request to locate a DHCP server. When correctly configured, the HMC responds to that request by allocating one of a selected range of addresses.

--------------------------------------

Open networks

The open (public) network used for user logins and for DLPAR operations. Connecting to the Internet allows the HMC to "call home" when there are any hardware errors that need to be reported.


This figure shows two HMCs connected to a single managed server on the private network and to three logical partitions on the public network.

(If you decide to use a private network, use DHCP, and if you will use an open network to manage an FSP, you must set the FSP’s address manually through the Advanced System Management Interface menus, however a private, non-routable network is recommended.)

--------------------------------------

INSTALLING AND CONFIGURING A NEW HMC:

If this is a new installation, ensure that the managed system is not connected to a power source. If this is a second HMC that is connected to the same managed system, the managed system can be connected to a power source.

1.  Turn on the HMC and wait for the HMC to automatically select the default language and locale preference after 30 seconds.
2.  Accept the HMC license agreements and click "Log on and launch the Hardware Management Console web application."
3.  Login with hscroot und default-pw abc123
4.  Launch "Guided Setup Wizard"


5.  Change date/time/timezone
6.  Change default password for hscroot
7.  Configure HMC networks


    eth0 (private network):
    network type = private network
    Speed = default is "Autodetection" (if conn. to a switch, configure it manually: Change network sett. -> LAN Adapter)
    Enable DHCP = specify a DHCP address range
    (You can configure the HMC to be a DHCP server only on a private network)

    eth1 (public network: hmc-admin interface)
    network type = public network
    speed = default is "Autodetection" (if conn. to a switch, configure it manually: Change network sett. -> LAN Adapter)
    setup IP, netmask and gateway

8. Enable firewall-settings for eth1 (in the eth1 dialog-box)
    check or allow the following Services and Ports:
    ssh                         22:tcp
    secure remote web access    443:tcp,8443:tcp,9960:tcp
    RMC                         657:udp,657:tcp

9. Leave all other dialogs unchanged and finish changes made by the Wizard.

10. On the main view click on „HMC-Management“ and do the following:
    Enable „Remote Command execution“
    Enable „Remote Virtual Terminal“
    Enable „Remote Operation“

11. Reboot the HMC (so configuration changes will be available)
12. Login with the new hscroot password
13. Plug network cables into the HMC and check if HMC is answering DHCP request by plugging the cable to your laptop.

--------------------------------------

Determining HMC adapter names:

If you set up a DHCP server, that server can operate only on eth0 and eth1.(You might need to determine which adapter to plug the ethernet cable into.)

To determine the name the HMC has assigned to an Ethernet adapter, do the following:
1. Open the restricted shell terminal. Select HMC Management -> Open Restricted Shell Terminal.
2. Type the following at the command line: tail -f /var/log/messages
3. Plug in your Ethernet cable. (If the cable was already plugged in, then unplug it, wait 5 seconds, and plug in the cable again.)
5. You will see a similar output on the console: Aug 28 12:41:20 termite kernel: e1000: eth0: e1000_watchdog: NIC Link is Up 100.
6. Repeat this procedure for all other Ethernet ports, and record your results.
7. Type Ctrl+C to stop thetailcommand.

--------------------------------------

Testing the connection between the HMC and the managed system:

This option enables you to verify that you are properly connected to the network:
(to test network connectivity, you must be a member of super administrator or service representative)
1. In the Navigation area, click HMC Management.
2. Click Test Network Connectivity.
3. In the Ping tab, type the host name or IP address of any system to which you want to connect. To test an open network, type the gateway.
4. Click Ping.

--------------------------------------

put ssh_key to HMC (passwordless login as hscroot)

version 1:
    - scp hscroot@hmc_name:.ssh/authorized_keys2 temp_hmc
    - cat id_rsa.pub >> temp_hmc
    - scp temp_hmc hscroot@hmc_name:.ssh/authorized_keys2
    - Test it: ssh hscroot@hmc_name date

version 2:
    scp id_rsa.pub hmc9:                        <--copy your public key to hmc
    ssh hmc9                                    <--login to hmc (it will ask for a password at this time)
    KEY=`cat id_rsa.pub`                        <--put in the cat command to a variable
    mkauthkeys -a "$KEY"                        <--puts the public key into authorized_keys file
    ssh hmc9                                    <--logint without a password

--------------------------------------

NTP configuration on a HMC

# lshmc -r -Fxntp,xntpserver                <--check if ntp service is enabled: enable,<ntp_server_name> (/var/log/ntp logfile can be checked as well)
# chhmc -c xntp -s add -a <ntp_server_name>  <--configure ntp service and add ntp server to HMC
# chhmc -c xntp -s enable                   <--activate NTP service

--------------------------------------

Article 1

$
0
0

VIO Install, Config (VIO Build)


These main steps will be followed:
- VIO Server creation on HMC
- VIO Server installation
- VIO Server configuration
- Network configuration (SEA, VLANs)
- Performance Tuning
- Additional things

-----------------------------------------------------------------

VIO Server creation on HMC 

CPU settings:
Shared, Uncapped weight: 255 (Proc. compatibility mode: Default)
Proc. Unit: min: 0.1, desired: 2,  max: number of CPUs in server (for smaller servers desired can be 1)
Virt. Proc: min: 1, desired: 6, max: number of CPUs in server (for smaller servers desired can be 3)

Memory settings:
min: 1 GB, Desired: 6 GB (it depends on how it will be utilized) max: 3x of desired

Adapters:
SAS RAID Adapter + USB + add only 1Gb Network to have correct device sequence later (after VIO install add 10Gb + FC adapter)

After VIO is created, in General Settings of VIO:
- Enable Mover Service Partition
- Enable Connection Monitoring (this is the connection between LPAR and HMC)
- Allow Perf. Information Collection

VIO IP address
Usually a 1GB adapter is used to login and install VIO, an IP address will be needed for that (it may need to be registered in DNS)

-----------------------------------------------------------------

VIO Server installation

There are more options for VIOS installation:
VIOS install from USB stick
VIOS install from HMC
VIOS install from NIM


VIOS install from USB stick: 
- Download ISO from IBM whose name contains the word flash
- Using software from Rufus (https://rufus.ie/) a bootable USB stick can be created
- After plug in USB stick in the Power server, and booting up VIOS LPAR, installation can be completed in HMC console


VIOS install from HMC
- Download DVD ISO from IBM
- Upload ISO images to HMC, using menu point on HMC: HMC Management --> Templates and OS Images
- During VIO activation on HMC, choose VIO install (takes more than an hour, at the end progress bar was hanging for 20 minutes)
- After installation completed accept License and close window


VIOS install from NIM

Prepare mksysb from ISO images:
- download DVD1 and DVD2 ISO images and copy to NIM
- mount ISO images: # loopmount -i dvdimage.v1.iso -o "-V cdrfs -o ro" -m /mnt2
- copy mksysb images from /usr/sys/inst.images to another directory (on Volume1 there are 2 mksysbs, on Volume 2 there is only one, during copy change name to avoid overwrite)
- combine 3 mksysb images into 1 (with command cat): # cat mksysb_image mksysb_image2 mksysb_image3 > vios2.2.3.4.mksysb

Create NIM resources and initiate restore:
- create mksysb res.: # nim -o define -t mksysb -a server=master -a location=/nim/mksysb/vios/gi_vios_2234.mksysb mksysb_gi_vios_2234
- create spot: # nim -o define -t spot -a server=master -a location=/export/spot -a source=mksysb_gi_vios_2234 spot_gi_vios_2234
- add VIOS IP to /etc/hosts (I used here newvio1 as a name)
- VIO NIM client: nim -o define -t standalone -a platform=chrp -a if1="find_net newvio1 0" -a netboot_kernel=64 -a connect=nimsh newvio1
- initiate restore: # nim -o bos_inst -a source=mksysb -a mksysb=mksysb_gi_vios_2234 -a spot=spot_gi_vios_2234 -a accept_licenses=yes -a no_client_boot=yes newvio1

SMS boot, configure IPs, restore mksysb....

-----------------------------------------------------------------

VIO Server configuration
(after installation is completed)

During first login:
give password for padmin:
accept conditions: a
oem_setup_env --> license -accept

Set IP and Hostname
# chdev -l en0 -a netaddr=172.23.88.67 -a netmask=255.255.254.0 -a state=up
# chdev -l inet0 -a route=0,172.23.88.1
# smitty hostname

Update VIO if needed:
# mount nimserver:/mgmt /mnt
$ updateios -accept -install -dev /mnt/VIO/VIO_3.1.0.10_Update
$ shutdown -restart
$ updateios -commit

Network files:
update resolv.conf with domain, search list and nameservers (root.staff, 644)
update netsvc.conf with "hosts = local, bind4" (root.system, 664)
update /etc/hosts with needed host entries

paging space:
(6 GB (remove: paging00 and  increase hd6 6GB, (12 pp with pp size 512MB))
# swapoff /dev/paging00
# rmps paging00
# chps -s 11 hd6

dump device
(set dump device: lv_dump00 (8 pp with pp size 512MB))
# lsvg -l rootvg
# sysdumpdev -l
# sysdumpdev -Pp /dev/sysdumpnull
# extendlv lg_dumplv 6
# chlv -n lv_dump00 lg_dumplv
# sysdumpdev -Pp /dev/lv_dump00

NTP
create missing files with touch:
$ ls -l /home/padmin/config
total 32
-rwxrw----    1 root     staff           730 Jan 06 06:46 ntp.conf
-rwxrw----    1 root     staff             9 Jul 01 2007  ntp.drift
-rwxrw----    1 root     staff             1 Jan 06 06:47 ntp.log
-rwxrw----    1 root     staff             1 Jan 06 06:47 ntp.trace

add missing things to ntp.conf:
# cat /home/padmin/config/ntp.conf:
server ntp.mydomain.com
driftfile /home/padmin/config/ntp.drift
tracefile /home/padmin/config/ntp.trace
logfile /home/padmin/config/ntp.log

uncomment  ntp line in /etc/rc.tcpip with vi:
start /usr/sbin/xntpd -a '-c /home/padmin/config/ntp.conf'"$src_running"

TZ (Time Zone)
# cat /etc/environment | grep TZ
TZ=Europe/Vienna

mirror rootvg
$ extendvg rootvg hdisk1
$ mirrorios -defer hdisk1
# bosboot -ad hdisk0
# bosboot -ad hdisk1

dumplv
We need 2 dumpdevices with correct name and size (one on hdisk0 one on hdisk1):
lv_dump00           sysdump    8       8       1
lv_dump01           sysdump    8       8       1

# mklv -t sysdump -y lv_dump01 rootvg 8  hdisk1; sysdumpdev -Ps /dev/lv_dump01

syslog
# vi /etc/syslog.conf
*.debug/var/log/messages  rotate size 1m files 10
auth.debug/var/log/auth.log  rotate size 1m files 10

# touch /var/log/messages; touch /var/log/auth.log; refresh -s syslogd

ssh key
Remove authorized_keys2 and create authorized_keys file with needed ssh pub key

add missing adapters
(make sure device name numbers are correct)
add 10GB network cards
add FC adapter

set recommended rules
$ rules -o diff -s -d (to view the differences between system and the recommended settings)
$ rules -o deploy -d (deploy the VIOS recommended default setting)

shutdown+activate LPAR
(make sure setting in profile are correct)
$ shutdown

-----------------------------------------------------------------

Network configuration:

In HMC Enhanced GUI Link aggregation and SEA can be fully configured there (no VIOS commands needed)
(this is good if adapter IDs are not important as we cannot specify those there)

Create LACP Etherchannel: 
Virtual Networks --> Link Aggr. Devices --> Add device (ieee8023ad)

Add virtual networks (VLANs)
(on HMC the Network Bridge means actually the SEA)
 Add a new VLAN: give a name, Bridged, 802.1Qtagging yes, then it will create a new Network Bridge (SEA): Bridge PVID 1, Large Send
When first VLAN is created an additional Virt. Network is also created automatically (with VLAN ID 1), it can be renamed if needed
Add additional VLANs

----------------------------------------
If manual configuration is needed in command line (dual VIOS setup):

Creating Virt. Eth. adapter on HMC (create as many as needed, then save in profile):
$ chhwres -r virtualio -m myp950 -p myvio01 -o a -s 100 --rsubtype eth -a "ieee_virtual_eth=1,port_vlan_id=4000,\"addl_vlan_ids=3029,1874\",is_trunk=1,trunk_priority=1"
$ chhwres -r virtualio -m myp950 -p myvio02 -o a -s 100 --rsubtype eth -a "ieee_virtual_eth=1,port_vlan_id=4000,\"addl_vlan_ids=3029,1874\",is_trunk=1,trunk_priority=2"
$ mksyscfg -r prof -m myp950 -p myvio01 -o save -n default --force
$ mksyscfg -r prof -m myp950 -p myvio02 -o save -n default --force

Creating Etherchannel (Link Aggregation, LACP) on VIOS: 
$ mkvdev -lnagg ent4 ent5 -attr mode=8023ad hash_mode=src_dst_port

Creating SEA on VIOS:
$ mkvdev -sea ent18 -vadapter ent12 ent14 ent16 ent17 -default ent12 -defaultid 4000 -attr ha_mode=auto
$ chdev -dev ent20 -attr ha_mode=sharing (first VIOS1 after VIOS2)
----------------------------------------

-----------------------------------------------------------------

Performance tuning:

increase buffers for Virt. Eth. adapters in SEA
chdev -l ent9 -a max_buf_huge=128 -P
chdev -l ent9 -a min_buf_huge=64 -P
chdev -l ent9 -a max_buf_large=128 -P
chdev -l ent9 -a min_buf_large=64 -P
chdev -l ent9 -a max_buf_medium=512 -P
chdev -l ent9 -a min_buf_medium=256 -P
chdev -l ent9 -a max_buf_small=4096 -P
chdev -l ent9 -a min_buf_small=2048 -P
chdev -l ent9 -a max_buf_tiny=4096 -P
chdev -l ent9 -a min_buf_tiny=2048 -P

same in 1 liner:
# chdev -l ent9 -a max_buf_huge=128 -P; chdev -l ent9 -a min_buf_huge=64 -P; chdev -l ent9 -a max_buf_large=128 -P; chdev -l ent9 -a min_buf_large=64 -P; chdev -l ent9 -a max_buf_medium=512 -P; chdev -l ent9 -a min_buf_medium=256 -P; chdev -l ent9 -a max_buf_small=4096 -P; chdev -l ent9 -a min_buf_small=2048 -P; chdev -l ent9 -a max_buf_tiny=4096 -P; chdev -l ent9 -a min_buf_tiny=2048 -P

largesend and large_receive
On VIO largesend was already turned on, and large_recieve was on "no", so this have to be changed to "yes" (online)
# chdev -l ent10 -a large_receive=yes

queue_depth for hdisks (if needed)
(num_cmd_elems for FC adapters should be already set by VIOS rules)
chdev -l hdiskX -a queue_depth=32 -P

-----------------------------------------------------------------

!!! Reboot!!!

-----------------------------------------------------------------

Additional things may needed:
- check LPAR profile (just to be sure config is OK)
- install additional device drivers
- install additional tools like rsync, screen, lsof...
- add VIO server to monitoring tool (like LPAR2RRD)
- set up crontab (for backup scripts ...)
- create a backup

-----------------------------------------------------------------

Article 1

$
0
0

QEMU - AIX on x86

QEMU (Quick EMUlator) is a machine emulator program, which is capable to create VMs with different processor architectures. For example if we want to test a Solaris (with RISC processor) or an HP-UX (with HPPA) or an AIX (with Power processor) QEMU can emulate that processor type and run the specified OS on that. So on Windows or Linux (on x86) with QEMU we can run AIX.

After installing QEMU, we can use a command to create an empty virtual disk and after a VM (with specified RAM and additional devices). If we use an AIX DVD during the boot, AIX will be installed there. (After installation not all AIX commands are available but many things still possible to do.)

Without any prior experience in QEMU, I used these 2 sources:
https://astr0baby.wordpress.com/2018/11/04/running-aix-7-2-tl3sp1-on-x86_64-via-qemu-system-ppc64/
http://gibsonnet.net/blog/cgaix/resource/AIX_QEMU_blog.pdf

--------------------------------------------------------------

AIX on Linux

Very important: be patient during this process, things can be (very) slow sometimes.

On Windows I installed VirtualBox and I created a Linux VM (CentOS 8). The plan was that on this linux VM in VirtualBox I will create an AIX VM using QEMU. After CentOS 8 installation completed, I configured network, so I could ssh to my linux server and do these steps:

0. Download AIX DVD 
From IBM ESS site download AIX DVD. I used 7.1 TL5 SP5, DVD1 is enough (710505.iso). Copy  to any directory, I used /root/aix.

1. Install Qemu
I could not find latest qemu package on linux (only version 2 was available, but that did not support latest Power systems), so it had to be compiled from source code:
(I had to install git and other missing things like glib-devel ...)
# git clone git://git.qemu.org/qemu.git   <--it downloads latest source code (automatically creates a qemu dir where I start command)
# cd qemu                                <--go to qemu dir which was created by git
# mkdir build; cd build                  <--create a build directory and go there
# ../configure                            <--checks if all requirements are OK
# make                                   <--this compiles the source code (it can take long)
# make install                            <--it installs compiled software
# qemu-system-ppc64 --version             <--check if it works correctly
QEMU emulator version 4.2.50 (v4.2.0-2665-g3d0ac34603)
Copyright (c) 2003-2019 Fabrice Bellard and the QEMU Project developers

2. Create a disk file
Go to the AIX DVD dir and create a disk which will be used by AIX
# qemu-img create -f qcow2 hdisk0.qcow2 20G
It will create an empty 20GB qcow2 disk image file, but its initial size is very small, as it is a sparse file. (So we have AIX DVD and this image file in our dir)

3. Create an AIX VM
This command will create an AIX VM with specified settings and boot it from DVD:
# qemu-system-ppc64 -cpu POWER8 -machine pseries -m 2048 -serial stdio -drive file=hdisk0.qcow2,if=none,id=drive-virtio-disk0 -device virtio-scsi-pci,id=scsi -device scsi-hd,drive=drive-virtio-disk0 -cdrom 710505.iso -prom-env "boot-command=boot cdrom:"

Parameters used:
-cpu: processor type, here POWER8
-machine: machine type, here pseries
-m: memory size, here 2GB
-serial: redirects serial output to specified device
-drive: the disk file we created before
-device: virtio-scsi-pci (not fully sure, but maybe this will create a virt. eth. adapter device)
-device: scs-hd (probably this will create hdisk device)
-cdrom: this is our downloaded AIX DVD which will be used during boot
-prom-env: sets NVRAM variable for PPC and SPARC servers, here a boot-command is used, which points to cdrom (DVD)


AIX boot will take several minutes, sometimes output can hang for 3-5 minutes. If everything is fine, the usual AIX install menu will apper (choose console and english language and default settings during install). The install will take about 2 hours, and disk file size will grow to 2.3GB. The installation process tries to restart AIX automatically after the install completed, but it was hanging, so after some time I did CTRL-C.

4. Fix fsck64 issue in Maintenance mode
fsck fails during boot and boot will hang. A workaround to this issue is to overwrite fsck64 file with exit 0. Boot our new AIX to maintenance moe:
# qemu-system-ppc64 -cpu POWER8 -machine pseries -m 2048 -serial stdio -drive file=hdisk0.qcow2,if=none,id=drive-virtio-disk0 -device virtio-scsi-pci,id=scsi -device scsi-hd,drive=drive-virtio-disk0 -cdrom 710505.iso -prom-env "boot-command=boot cdrom:"

When the "Welcome to Base Operating System" menu appears:  choose 3 (Start Maintenance Mode) --> 1 (Access a Root VG) -->  0 Continue  --> 1 (VG on hdisk0) --> 1 (Access this VG and start a shell). 

After that we will get a prompt with an environment where filesystems are already mounted:
# cd /sbin/helpers/jfs2    <--go to this location
# > fsck64                <--delete content of that file
# vi fsck64               <--vi and insert these 2 lines. File is readonly, so save and quit with :w! and :q
#!/bin/ksh
exit 0

# cat fsck64              <--it should contain 2 lines (#!/bin/ksh and exit 0)
# sync ; sync              <--write cached memory to disk
# halt                    <--halt AIX


5. Boot from disk
This is the first time AIX will be booted from disk:
# qemu-system-ppc64 -cpu POWER8 -machine pseries -m 2048 -serial stdio -drive file=hdisk0.qcow2,if=none,id=drive-virtio-disk0 -device virtio-scsi-pci,id=scsi -device scsi-hd,drive=drive-virtio-disk0 -cdrom 710505.iso -prom-env "boot-command=boot disk:"

This boot will take much longer (about 5-10 minutes) as some daemons will fail and it will hang at NFS part until timeout, but we will get a prompt. After that some services will be disabled (so next boots will be faster) and installed ssh from DVD.
Disabling services in inittab:
# rmitab rcnfs
# rmitab cron
# rmitab piobe
# rmitab qdaemon
# rmitab writesrv
# rmitab naudio2
# rmitab naudio
# rmitab aso
# rmitab clcomd
# chrctcp -S -d tftpd

Install ssh and change root pw:
# chfs -a size=+200M /home
# mount -v cdrfs -o ro /dev/cd0 /mnt
# mkdir /home/ssh; cd /mnt/installp/ppc; cp openssh.base openssh.license openssh.man.en_US openssh.msg.en_US /home/ssh; umount /mnt
# cd /home/ssh; installp -acXY -d . all
# passwd root
# halt

After that booting up from disk should be faster.

6. Network setup
I wanted to use ssh on AIX, so network setup was needed. (When I worked in qemu terminal and I did ctrl-c, the whole qemu session (process) was stopped, so I had to boot again the VM, that was another reason to use ssh sessions.) Without knowing linux network virtualization techniques, it was not easy, but found this site, which worked: http://hostrepo.com/article.php?id=193. Basically a network bridge was needed, so network communication could be possible between my Linux and AIX VM. On Linux this network bridge function can be achieved by a TAP (Terminal Access Point) device and with ARP proxy. The following steps are needed each time after Linux is restarted, so these can be put in a script as well. (There are lots of internet sites which shows different other methods.)

current IP on Linux: 10.0.2.15 (enp0s3)
planned IP on AIX: 10.0.2.16 (en0)

On the Linux VM:
# ip tuntap add tap0 mode tap                      <--create tap0 interface ('ifconfig' will not show it, 'ip a' shows state is DOWN)
# ip link set tap0 up                              <--bring up tap0 ineterface ('ifconfig' will show tap0 state is UP)
# echo 1 > /proc/sys/net/ipv4/conf/tap0/proxy_arp  <--enable proxy arp on tap0 (empty file was already there)
# ip route add 10.0.2.16 dev tap0                  <--setup routing for 10.0.2.16 (AIX IP) on tap0 device ('ip route' shows new route)
# arp -Ds 10.0.2.16 enp0s3 pub                     <--broadcast ARP for AIX IP ('yum install net-tools' was needed for arp, netstat commands)

Boot up AIX using tap0 device:
# cd /root/aix
# qemu-system-ppc64 -cpu POWER8 -machine pseries -m 2048 -serial stdio -drive file=hdisk0.qcow2,if=none,id=drive-virtio-disk0 -device virtio-scsi-pci,id=scsi -device scsi-hd,drive=drive-virtio-disk0 -cdrom 710505.iso -prom-env "boot-command=boot disk:" -net nic,macaddr=56:44:45:30:31:32 -net tap,script=no,ifname=tap0

Then on AIX:
# chdev -l en0 -a netaddr=10.0.2.16 -a netmask=255.255.255.0 -a state=up

After that ping and ssh is possible to AIX. AIX IP configuration will survive restarts, but Linux steps are needed each time after Linux VM is rebooted. In future if we want to start AIX in the background without a console this can be used:
# qemu-system-ppc64 -cpu POWER8 -machine pseries -m 2048 -drive file=hdisk0.qcow2,if=none,id=drive-virtio-disk0 -device virtio-scsi-pci,id=scsi -device scsi-hd,drive=drive-virtio-disk0 -cdrom 710505.iso -prom-env "boot-command=boot disk:" -net nic,macaddr=56:44:45:30:31:32 -net tap,script=no,ifname=tap0 -daemonize

(logout from session, after AIX shutdown is possible using "~~.", same as in HMC console)

--------------------------------------------------------------

AIX on Windows

It is possible to do the same steps (as above) directly on Windows without VirtualBox and a Linux VM. The only difference is that we need to give qemu commands in command prompt (cmd) or in a terminal emulator (like MobaXterm). With these terminals on Windows there could be character problems.

We need to install latest Qemu on Windows: https://www.qemu.org/download/#windows. After install completed, above steps can be  followed, with slight modification in qemu commands:

Create a disk file: 
"C:\Program Files\qemu\qemu-img.exe" create -f qcow2 hdisk0.qcow2 20G

Boot an AIX VM and install AIX from DVD:
"C:\Program Files\qemu\qemu-system-ppc64.exe" -cpu POWER8 -machine pseries -m 2048 -serial stdio -drive file=hdisk0.qcow2,if=none,id=drive-virtio-disk0 -device virtio-scsi-pci,id=scsi -device scsi-hd,drive=drive-virtio-disk0 -cdrom 710505.iso -prom-env "boot-command=dev / 0 0 s\" ibm,aix-diagnostics\" property boot cdrom:\ppc\chrp\bootfile.exe -s verbose" -display vnc=:1

Boot our newly installed VM into Maintenance Mode and fix fsck64:
"C:\Program Files\qemu\qemu-system-ppc64.exe" -cpu POWER8 -machine pseries -m 2048 -serial stdio -drive file=hdisk0.qcow2,if=none,id=drive-virtio-disk0 -device virtio-scsi-pci,id=scsi -device scsi-hd,drive=drive-virtio-disk0 -cdrom 710505.iso -prom-env "boot-command=boot cdrom:" -display vnc=:1

Boot AIX from disk:
"C:\Program Files\qemu\qemu-system-ppc64.exe" -cpu POWER8 -machine pseries -m 2048 -serial stdio -drive file=hdisk0.qcow2,if=none,id=drive-virtio-disk0 -device virtio-scsi-pci,id=scsi -device scsi-hd,drive=drive-virtio-disk0 -cdrom 710505.iso -prom-env "boot-command=boot disk:" -display vnc=:1

--------------------------------------------------------------

Article 2

$
0
0

SSP Administration

PowerVC and SSP

SSP is a fully supported storage provider in PowerVC. SSP was developed much earlier than PowerVC, but its shared setup can fit very well to the cloud nature of PowerVC. After creating an SSP (few clicks in HMC GUI), PowerVC (which is connected to the HMC) will recognize it automatically and without any additional tasks we can start to create LUs and deploy VMs. (There is no strict distinction, but the word LUN is used more for physical volumes attached to VIOS (lspv), and the word LU for virtual disks created in SSP.)

What is important that each VIO server, which is part of the SSP cluster, has to see the same LUNs. The virtual disks (LUs), which are created in SSP, can be found as files in a special filesystem: /var/vio/SSP/SSP_Cluster_1/D_E_F_A_U_L_T_061310. This fs is created during SSP creation and it is available on each VIO server. (These LUs are basically files in that filesystem, and because these LUs are thin provisioned, these files are so called 'sparse files'). SSP commands can be run as padmin on each VIOS.

/var/vio/SSP/SSP_Cluster_1/D_E_F_A_U_L_T_061310/VOL1  <--contains LUs available in PowerVC
/var/vio/SSP/SSP_Cluster_1/D_E_F_A_U_L_T_061310/IM    <--contains Images available in PowerVC

cluster -list                                         <--lists available SSP clusters
cluster -status -clustername <CLUSTER_NAME> -verbose  <--it will show primary database node as well (grep -p DBN)

lu -list                                              <--lists SSP LUs
snapshot -list                                        <--lists snapshots (images in PowerVC)
lssp -clustername <Cluster_Name> -sp <SSP_Name> -bd   <--old command to list LUs (bd is backing device)


-------------------------------------

Adding a new LUN to SSP

If we want to increase the available free space in SSP we need to add a new LUN to it.

1. request a new LUN from SAN team      <--should be a shared LUN assigned to each VIO server in SSP
2. cfgmr (or cfgdev as padmin)          <--bring up new disk on all VIO, make sure it is the same disk
3. chdev -l hdisk$i -a queue_depth=32   <--set any parameters needed
4. in HMC GUI add new disk to SSP       <--on HMC SSP menu choose SSP, then check mark SSP (System Default) --> Action --> Add Capacity

After that PowerVC  will automatically recognize, no steps are needed in PowerVC. df -g can be used to monitor available free space in /var/vio/SSP/SSP_Cluster_1/D_E_F_A_U_L_T_061310.

-------------------------------------

Removing leftover LUs from SSP

Sometimes a volume has been deleted in PowerVC, but they are still visible in SSP. These can be removed from SSP commands with lu -remove ... What is important, to make sure these LUs are really not used by anything. (LUs can be used by VMs and also by Images!!!)

1. check LU list on HMC, PowerVC and VIO                <--HMC and PowerVC GUI lists LUs, on VIO 'lu -list' can be used
2. lu -list -attr provisioned=false                     <--on VIO lists LUs which are not assigned to any LPARs
3. lu -remove -clustername <Cluster_Name> -luudid <ID>  <--remove a LU from SSP

If there are many LUs this for cycle can be used as well:
$ for i in `lu -list -attr provisioned=false | awk '{print $4}'`; do lu -remove -clustername SSP_Cluster_1 -luudid $i; done

-------------------------------------

PowerVC Images, Snapshots, LUs and SSP

When an Image is created in PowerVC sometimes a file is created in SSP, sometimes not. It depends on how Image creation has been started. This "inconsistency" can lead to problems when we want to find that specific file in SSP which contains our Image in PowerVC.

Images and LUs are stored in 2 different places in SSP:
# ls -l /var/vio/SSP/SSP_Cluster_1/D_E_F_A_U_L_T_061310
drwxr-xr-x    2 root     system         8192 Feb 19 11:19 IM       <--Images (these are LUs, but "lu" commands will not list them)
drwxr-xr-x    8 root     system          512 Feb 03 2018  VIOSCFG
drwxr-xr-x    2 root     system        32768 Feb 20 08:47 VOL1     <--LUs         


Volume and LU:
Both are referring to the same disk, just Volume is used in PowerVC, and LU is used in SSP commands. When we create a PowerVC Volume, in the background PowerVC will create a new disk in SSP. The end result is a file in the VOL1 directory (/var/vio/SSP/SSP_Cluster_1/D_E_F_A_U_L_T_061310/VOL1). The lu ... SSP commands will list files in VOL1 directory (not in IM).

Image and Snapshot:
PowerVC images are needed to create new AIX VMs. The word Image is used only in PowerVC (not in SSP commands). Images can be created in 2 different ways:
-capturing a VM (in PowerVC VMs menu): a new file is created in IM directory and it takes minutes
-creating from a Volume (in PowerVC Images menu): no new files are created (same LU is used from VOL1), it takes seconds

When an Image is ready, we can use it to create (deploy) new AIX VMs. During deployment a "snapshot" is created. A snapshot is a link to the disk from which it was created, and this snapshot is the "disk" of the new AIX VM. The actual size of this AIX VM in SSP is very minimal (sometimes I could not recognize the change), because it contains the same data as the Image.

When we create a Volume in PowerVC, a LU is created in SSP. This LU can exist without any assignment or dependency. When we modify this LU to be an Image in PowerVC it is still "independent". But when we deploy AIX VMs from this Image, snapshots will be created which are depending on the LU. It means we cannot remove this LU (or Image) file until there are snapshots which are referring to it. (In PowerVC GUI, we can remove images at any time, but this is a "fake" removal. PowerVC will show that it deleted successfully an image, but in the background if snapshots from that image still exist, no free space will be reclaimed, the used storage space will be the same. If we check "snapshot -list" command we could be surprised to find a lots of images in the output, which does not exist in PowerVC anymore, but still exist in SSP.)

-------------------------------------

snapshot -list:

This command displays all Images and its Snapshots. It does not matter how Images were created (from a Volume or from a VM) it will be listed. The output has 2 parts. The first part (which start with "Lu Name") will list Images which are created from Volumes (in VOL1 directory) and its Snapshots. The second part (which start from "Lu(Client Image)Name") will lists Images in IM directory and its Snapshots.

$ snapshot -list
Lu Name                  Size(mb)    ProvisionType    %Used Unused(mb)    Lu Udid
volume-bb_dd_61-c20cc6.. 153600      THIN             0%    153609        9191dee4a3ba... <--this is a Volume and Image (in VOL1)
Snapshot
72a40f070213e2450b8d19672f22a5dcIMSnap                                                    <--this is a VM, shows LUN id (without IBMsnap)

Lu(Client Image)Name     Size(mb)    ProvisionType     %Used Unused(mb)   Lu Udid
volume-Image_7241-5c5b80ac-170b153   THIN              0%    153609       48004e96ecc2... <--this is an image in IM
     Snapshot
     c397bc118de59c4592429b2eb0bba738IMSnap                                               <--this is a VM with LUN id
     618afc4622c5286808a8173468ae161bIMSnap                                               <--this is a VM with LUN id

-------------------------------------

lu -list

This command will list all LUs and if a LU is functioning as an Image (Images in VOL1 dir) its Snapshots will be also displayed. Images which are in IM directory (captured from a VM) are not displayed here.

$ lu -list
POOL_NAME: SSP_1
TIER_NAME: System
LU_NAME                 SIZE(MB)    UNUSED(MB)  UDID
volume-aix-central-111~ 153600      84140       81d15130e9a76596ad0b3564973d4912
volume-bb_dd_61-c20cc6~ 153600      153609      9191dee4a3ba8fe3c7753af592027aad          <--this is a Volume and Image (in VOL1)
SNAPSHOTS
72a40f070213e2450b8d19672f22a5dcIMSnap                                                    <--its Snapshot (AIX VM is created from Image)
volume-bb_dd_61_VM-1ce~ 153600      153160      72a40f070213e2450b8d19672f22a5dc          <--LU of the deployed AIX (same IDs)
volume-cluster_1-71eda~ 20480       20473       e12ba154470b2c8bd9a54eb588fc9d2e
volume-cluster_2-c8ab7~ 20480       20432       4e36795de9a3f90710ba995b97d7ccbd

-------------------------------------

Image removal if it is listed in snapshot -list command:

1. $ snapshot -list
….
volume-Image_ls-aix-test8_capture_1_volume_1-fc19d9fd-5dac153600         THIN                 1% 150942         8256526c4e512b54cbdd689d4e1e321a


2. $ lu -remove -luudid 8256526c4e512b54cbdd689d4e1e321a
Logical unit  with udid "8256526c4e512b54cbdd689d4e1e321a" is removed.

After that file will be deleted in IM directory as well

-------------------------------------

Image removal if it is not listed in snapshot commands:

In this case there are files in IM directory, but usual SSP commands will not list them. It is possible to manually remove those files (rm), but it works only if these images (LUNs) are not listed as "LU_UDID_DERIVED_FROM"

1. Checked files in IM direcory:
ls -ltr /var/vio/SSP/SSP_Cluster_1/D_E_F_A_U_L_T_061310/IM
volume-Image_AIX-710404_base2_puppet_capture-445b36df-bbee.b38417a6fd9f8eab66c2f7e6e02818cc

It lists PowerVC images (some were not listed in PowerVC GUI). The characters after the dot (.) showing the LUN id, which can be used in searches.

2. Searching LUN ids in "lu -list verbose":
for i in `ls -ltr /var/vio/SSP/SSP_Cluster_1/D_E_F_A_U_L_T_061310/IM | awk -F'.''{print $2}'`; do ls /var/vio/SSP/SSP_Cluster_1/D_E_F_A_U_L_T_061310/IM| grep $i; lu -list -verbose| grep -p $i; echo "========="; echo; done

3. Remove files if possible:
If there are no reference for a specific Image file (LUN id) in this verbose command then "rm filename" will work, otherwise, we get this error:
# rm volume-Image_AIX-710404_base_nocloud_capture-0d466084-d9bb.054d6d02cf133e4aef56437f4524f016
rm: 0653-609 Cannot remove volume-Image_AIX-710404_base_nocloud_capture-0d466084-d9bb.054d6d02cf133e4aef56437f4524f016.
Operation not permitted.

-------------------------------------

SSP dd examples

# cd /var/vio/SSP/SSP_Cluster_1/D_E_F_A_U_L_T_061310/IM

To export the volume to a file from SSP:
# dd if=volume-New-SSP-Image-Volume.7e2e5b5738d7adf4be3b64b9b731c2ff of=/tmp/aix7_img bs=1M

To import the volume from a file to SSP:
# dd if=/tmp/aix7_img of=VOL1/volume-New-SSP-Image-Volume.7e2e5b5738d7adf4be3b64b9b731c2ff bs=1M 

-------------------------------------

Article 1

$
0
0

YUM (Yellowdog Updater Modified)
https://public.dhe.ibm.com/aix/freeSoftware/aixtoolbox/ezinstall/ppc/README-yum

YUM is package manager for RPM packages, which allows automatic updates, package and dependency management. Yellowdog was a Linux distribution which was based on Red Hat. It had a package manager, which was called Yellowdog UPdater (YUP). It has been rewritten to support Red Hat based Linux system, and since then it is called YUM (Yellowdog Updater Modified.) YUM under the hood depends on RPM; which is a packaging standard.

YUM doesn't recognize AIX installp dependencies. For example: OpenSSL libraries are provided by AIX in installp format, so if an RPM package depends on a specific OpenSSL version then user should make sure to keep his OpenSSL version updated.

--------------------------------------------------------------------------------

RPM:

It is a free and open source package management system, which is available on AIX.

Without YUM thes RPM commands can be used on AIX
rpm -qa                       shows what rpm packages are installed
rpm -ql <package name>        shows where the files are installed (rpm -qlp .. shows the absolut paths???)
rpm -q --filesbypkg cdrecord  list all the files on installed rpm package
rpm -qf /usr/bin/lynx         query a file to find the source rpm package
rpm -qi <package name>
        list information on an installed rpm package
rpm -qR <package name>        list all dependencies on any rpm package
     
rpm -ivh httpd-2.2.8.aix5.1.rpm install the rpm package

rpm -ivh --force *.rpm
rpm -ivh --force --nodeps <package name>    does not check dependency (same can be done with "rpm -Uvh..." for upgrade)
rpm -e <package name> 
        removes the rpm package

rpm -Va                       shows which files are missing from the RPM database
rpm -Vv <package name>        verifies a package
rpm --rebuilddb               compress and rebuild the RPM database

/usr/sbin/updtvpkg            enables the rpm command to recognize that the libraries have been installed

In some cases you might get an error about failed dependencies when you install RPMs on AIX (for example, error: failed dependencies: libX11.a(shr4.o) is needed by tk-8.3.3-1). Most likely the error occurs because the rpm command does not recognize the shared library. If the error occurs, check to see if the X11 libraries are installed in the directory /usr/lpp/X11/lib. If they are not installed, use the AIX product media to install them. After you have installed the libraries, run the above command (updtvpkg). The command enables the rpm command to recognize that the libraries have been installed.

---------------------------------

Installing yum on AIX

1. install latest rpm.rte: https://ftp.software.ibm.com/aix/freeSoftware/aixtoolbox/INSTALLP/ppc/
# installp -qacXYd rpm.rte all

2. install all rpm packages contained in yum_bundle.tar
https://public.dhe.ibm.com/aix/freeSoftware/aixtoolbox/ezinstall/ppc/
# tar -xvf yum_bundle.tar
# rpm -Uvh *

Another way to install yum is to download yum.sh from https://public.dhe.ibm.com/aix/freeSoftware/aixtoolbox/ezinstall/ppc/.
Running this script will download and install the latest rpm.rte and yum_bundle.tar.

yum.conf file will be installed under the path /opt/freeware/etc/yum.
Additional yum repository files can be created under the path /opt/freeware/etc/yum/repos.d.

---------------------------------

AIX Toolbox Repositories

IBM provides the most widely used GNU and opensource Linux tools on AIX (like gcc, git, coreutils, perl, python, ruby, php etc.). These can be downloaded from the AIX Toolbox site: https://www.ibm.com/support/pages/node/882892

It is also possible to use AIX Toolbox as a yum repository, so dependencies will be handled automatically by yum. After installing yum, by default 3 IBM repositories are enabled for rpm packages in /opt/freeware/etc/yum/yum.conf.


These 3 repositories are: ppc, noarch and ppc-X.X
ppc:     Contains most of the rpms. These rpms are built on AIX 5.3, 6.1 and these can be installed on any higher versions of AIX
noarch:  Contains architecture independent packages (scripts, text files, which are not binaries), these can be installed on any AIX
ppc-6.1: Contains gcc which can be installed only on aix6.1.
ppc-7.1: Contains gcc which can be installed only on aix7.1.
ppc-7.2: Contains gcc/gcc-go which can be installed only on aix7.2.

The reason behind this is, that some of the rpm packages like gcc can only be installed on a specific version of AIX. For example, gcc built on AIX 6.1 will be allowed to be installed only on AIX 6.1 machines, so with the configuration of these separate repositories "yum install gcc" will work on all AIX servers, irrespective of AIX version.

-------------------------------------------------

/opt/freeware/etc/yum/yum.conf                    <--main yum configuration file

yum clean all                                     <--cleans up cache (to see new config, packages in repo cache has to be cleaned up)
yum search <keyword>                              <--to find packages containing the specified keywordin description from repository
yum list <package>                                <--shows status of a package (if it is installed or available in repositiry)
yum list <package> --showduplicates              <--lists all versions in repository (installed and all available versions)
yum info <package>                                <--info about a package
yum whatprovides <filename>                       <--shows which package contains given file (like: yum whatprovides zlib.so)
yum provides <filename>                           <--to find which package provides the file

yum install <package>                             <--installs a package + dependencies (more packages: yum install package1 package2 …)
yum install <package_name>-<version_info>        <--installs a specific version (like: yum install gcc-6.3.0-1)
yum localinstall </path/to/package>              <--installing a package from local path instead of a repository

yum update <package>                              <--updates a package (with its dependencies if needed)
yum check-update                                 <--check if a newer version of a package is available
yum remove <package>                              <--remove a package

yum history                                      <--lists history of yum actions (same as yum history list all)
yum history info <transaction_ID>                 <--gives details about the specified history transaction id
yum history undo <transaction_ID>                 <--roll backs the given tranaction id

yum repolist                                      <--list repositories
yum --disablerepo="*" --enablerepo="epel" list available      <--lists packages only in a specific repo (use output of "yum repolist" )
yum --disablerepo=* --enablerepo=LIVE* list Centrify*          <--lists installed and available packages from LIVE* repos

createrepo --checksum sha --update /etc/repo      <--update repo after a new package is copied there

---------------------------------

Creating local YUM repository

We need to choose an AIX or Linux server with HTTP access (Apache/NGNIX) that can be used as a repository server. The ideal scene is if it has access to the internet (so it can sync packages from IBM site). If it is not possible then we need to copy there manually the rpm packages. The YUM clients are connecting to the repository server using HTTP connections.  (I guess that is why the curl package is a prerequisite for the yum package.)

Detailed steps are described here:  https://developer.ibm.com/articles/configure-yum-on-aix/ and here: https://www.djouxtech.net/posts/aix-yum-installation/

1. Install yum-utils and createrepo (with dependencies)

2. Download all rpm packages what you need in repo
We can use the default IBM repositories to download rpm packages (if we have internet on the repository server). By default /opt/freeware/etc/yum/yum.conf contains the IBM repositories (yum repolist should show them), and reposync command will sync (download) content of a repository
# reposync -p <target_path> -r AIX_Toolbox -a ppc
# reposync -p <target_path> -r AIX_Toolbox_61 -a ppc
# reposync -p <target_path> -r AIX_Toolbox_71 -a ppc
# reposync -p <target_path> -r AIX_Toolbox_72 -a ppc
# reposync -p <target_path> -r AIX_Toolbox_noarch
(-p path to download, -r: the name of the repository, -a: architecture)

3. create repo
Run createrepo for all the downloaded packages:
# createrepo <target_path>/AIX_Toolbox
# createrepo <target_path>/AIX_Toolbox_61
# createrepo <target_path>/AIX_Toolbox_71
# createrepo <target_path>/AIX_Toolbox_72
# createrepo <target_path>/AIX_Toolbox_noarch

4. on AIX servers update repo config files with correct locations
On client servers, create new repo file in /opt/freeware/etc/yum/repos.d: like localrepos.repo:
# cat /opt/freeware/etc/yum/repos.d/localrepos.repo
[local_AIX_Toolbox]
name=local AIX generic repository
baseurl=http://reposerver.mydomain.com/ias-AIX/Toolbox/
enabled=1
gpgcheck=0
priority=1

[local_AIX_Toolbox_noarch]
name=local AIX noarch repository
baseurl=http://reposerver.mydomain.com/ias-AIX/Toolbox_noarch/
enabled=1
gpgcheck=0
priority=1

[locaL_AIX_Toolbox_71]
name=local AIX 7.1 specific repository
baseurl=http://reposerver.mydomain.com/ias-AIX/Toolbox_71/
enabled=1
gpgcheck=0
priority=1

5. disable IBM repos (if needed)
If localrepos will be used in /opt/freeware/etc/yum/yum.conf file IBM repositories can be disabled (enabled=0)

-------------------------------------------------

YUM repository update:

If we want to add additional packages to a repo, do these steps on the repository server:
1. copy package to correct repository (make sure permissions and user are correct)
3. update repo: createrepo --checksum sha --update /srv/packer/ias-AIX/Toolbox
4. on clients clean cache: yum clean all (so new packages vill be visible for yum commands)

-------------------------------------------------

Article 2

$
0
0
Red Hat - Netboot and Install from NIM server

A NIM server can boot up and install AIX servers from network using TFTP, BOOTP protocols. As other operating systems are using these same protocols for network boot (and install), our NIM server could be utilized for network booting and installing RHEL 6 or 7 servers as well. The process is basically the same on each environment, but the setup and configuration is different for AIX, RHEL 6 and RHEL 7. (In the Linux world there are many other methods to achieve this, like a Kickstart server, here wanted to show that NIM server is capable of doing these tasks.)

RHEL 6:
After network boot is started (tftp, bootp) the first reference on NIM is the /etc/yaboot.conf file, which points to a kickstart file (ks.cfg), which does the automatic install. For initiating a network boot we will use a fixed IP (172.23.72.15), but later during kickstart we will use dhcp (as it did not work with static ip, just with a local cdrom install) ks.cfg is configured to download install packages by HTTP (I tested with NFS and FTP but it did not really worked.)

RHEL 7:
Similar as above, just after network boot, /boot/grub/powerpc-ieee1275/grub.cfg file is used, this points to the kickstart config file as well.


Some additional details found on internet:
RHEL7 has moved to Grub2 as the boot loader, so there are a few things that are different... The biggest thing is that Grub2 will look for it's configuration in /boot on the TFTP server (not /etc like Yaboot does). RHEL7 is also smarter on NFS versions, so you shouldn't have to specify the version if using version 3 like you do on RHEL 6.

The Yaboot binary automatically looks for /etc in the TFTP directory. Since AIX doesn't chroot TFTP, you have to put things were Yaboot can find it. Similarly, if you are using Grub2 from and AIX boot system, it will look in /boot/grub2 for things it needs when network booting.


These steps will show how to install RH6 and RH7 servers via network from NIM:
1. HTTP access
2. Copy data from DVD
3. /etc/bootptab
4. Boot config files
5. /etc/tftpaccess.ctl
6. Kickstart file
7. Netboot

All the configuration will be done on the NIM server. A RH LPAR has been created earlier (same LPAR can be used for RH6 or RH7 install) and a fixed IP is reserved for this purpose:
172.23.72.15  - IP configured initially on RH for netboot
172.23.74.4   - IP of NIM server
172.23.72.1   - gateway
255.255.248.0 - subnet mask

----------------------------------------

1. HTTP access:

During installation we will use HTTP, so on our NIM server a webserver has been installed (Apache) and in httpd.conf this was needed to add at the end:

# vi /opt/freeware/etc/httpd/conf/httpd.conf
#RHEL image creation
Alias /export  "/export/"
<Directory "/export/">
    Options Indexes FollowSymLinks Includes MultiViews
    Require all granted
</Directory>


After that stop/start:
# /etc/rc.d/init.d/httpd start
# /etc/rc.d/init.d/httpd stop

----------------------------------------

2. Copy data from DVD

On the NIM server we need to copy the whole content of the RH DVD iso to a direrctory:
(this directory will be used during OS installation to install all the packages via http)

# loopmount….
# cp -prh /mnt /export/nim/rhel_6.10_ppc64
# cp -prh /mnt /export/nim/rhel_7.6_ppc64


For network boot we need to copy additional files from DVD, but there is a difference between RH6 and RH7, what files are needed on which locations:

RHEL 6:
- copy yaboot.conf from iso: /ppc/ppc64/yaboot.conf to /etc/yaboot.conf on NIM
- copy vmlinux (linux kernel) and initrd.img under /tftpboot directory
# mkdir -p /tftpboot/rhel6_ppc64
# cp /export/nim/rhel_6.10_ppc64/ppc/ppc64/initrd.img /tftpboot/rhel6_ppc64
# cp /export/nim/rhel_6.10_ppc64/ppc/ppc64/vmlinuz /tftpboot/rhel6_ppc64


RHEL 7:
the main directory is /boot,  which was copied from ISO image:
# cp -prh /export/nim/rhel_7.6_ppc64/boot /boot

Beside that initrd.img and vlinuz was also copied to /boot:
# cp /export/nim/rhel_7.6_ppc64/ppc/ppc6/initrd.img /boot
# cp /export/nim/rhel_7.6_ppc64/ppc/ppc6/vmlinuz /boot

----------------------------------------

3. /etc/bootptab

/etc/bootptab has to be updated manually so network communication is possible during netboot.

Added these lines at the end of bootptab file:
(yaboot and core.elf files have been copied earlier)

RHEL 6:
ls-rh-ppc64-base:bf=/export/nim/rhel_6.10_ppc64/ppc/chrp/yaboot:ip=172.23.72.15:ht=ethernet:sa=172.23.74.4:gw=172.23.72.1:sm=255.255.248.0:

RHEL 7:
ls-rh-ppc64-base:bf=/boot/grub/powerpc-ieee1275/core.elf:ip=172.23.72.15:ht=ethernet:sa=172.23.74.4:gw=172.23.72.1:sm=255.255.248.0:


After installation completed these lines should be removed manually.

----------------------------------------

4. Boot config files

The main config file for inital network boot is different for RHEL6 and 7:
RH6: yaboot.conf
RH7: grub.cfg

RHEL 6: /etc/yaboot.conf
During network boot a filename with MAC address is searched, if that file is missing, then boot process will check different MAC address and IP variations. For each variation there is a timeout if that file is not found… so we don’t want to wait 2 mins, create a link with MAC address to this file:
# cd /etc
# ln -s yaboot.conf 01-fa-8e-09-73-18-20

(I tried to use NFS which worked here, but later in the kickstart file it did not work NFS, so I changed to HTTP everywhere)
# cat /etc/yaboot.conf
init-message = "\nWelcome to the 64-bit Red Hat Enterprise Linux 6.10 installer!\nHit <TAB> for boot options.\n\n"
timeout=50
default=linux

image=rhel6_ppc64/vmlinuz
        label=linux
        initrd=rhel6_ppc64/initrd.img
#       append="ks=nfs:nfsvers=3:172.23.74.4:/export/nim/misc/rhel6_ppc64_ks.cfg ksdevice=eth0 ip=172.23.72.15 netmask=255.255.248.0 gateway=172.23.72.1"
        append="ks=http://172.23.74.4/export/nim/misc/rhel6_ppc64_ks.cfg ksdevice=eth0 ip=172.23.72.15 netmask=255.255.248.0 gateway=172.23.72.1"
        read-only


RHEL 7: /boot/grub/powerpc-ieee1275/grub.cfg
# cat /boot/grub/powerpc-ieee1275/grub.cfg
set default=0
set timeout=5

echo -e "\nWelcome to the Red Hat Enterprise Linux 7.6 installer!\n\n"

menuentry "RHEL for PowerPC" {
     linux /boot/vmlinuz ro ip=172.23.72.15::172.23.72.1:255.255.248.0:ls-rh-ppc64-base:eth0:none inst.repo=http://172.23.74.4/export/nim/rhel_7.6_ppc64/ inst.ks=http://172.23.74.4/export/nim/misc/rhel7_ppc64_ks.cfg
     initrd /boot/initrd.img
}

----------------------------------------

5. /etc/tftpaccess.ctl

On the NIM server we need to grant access to the needed resources. Some lines have been added to /etc/tftpaccess.ctl.

# cat /etc/tftpaccess.ctl
# NIM access for network boot
allow:/tftpboot
allow:/tftpboot/rhel6_ppc64
allow:/export/nim/rhel_6.10_ppc64
allow:/etc/yaboot.conf


Some side note:
NFS export is not needed as we use HTTP. I did some experiment with NFS and I leave here commands I used (just in case):
exportfs -i /export/nim/rhel_6.10_ppc64
exportfs -i /export/nim/misc

unexport:
exportfs -u /export/nim/rhel_6.10_ppc64
exportfs -u /export/nim/misc

----------------------------------------

6. Kickstart file:

Kickstart files are controlling what settings should be used during install (timezone, language...) 2 files have been created in /export/nim/misc, one for RH6 and one for RH7. (the url line contains the path on NIM sever for the install resources)

RHEL 6:
# cat rhel6_ppc64_ks.cfg
lang en_US
keyboard us
timezone Europe/Vienna --isUtc
rootpw $1$3Qm1F030$Q6ExOTiF/ndBk7neDKNZp1 --iscrypted
#platform IBM pSeries
reboot
text
#cdrom
url --url http://aix-mgmt.mydomain.org/export/nim/rhel_6.10_ppc64
bootloader --location=mbr --append="rhgb quiet crashkernel=auto"
zerombr
clearpart --all --initlabel
autopart
#network --device=eth0 --bootproto=static --ip=172.23.72.15 --netmask=255.255.248.0 --gateway=172.23.72.1
network --device eth0 --bootproto dhcp --hostname ls-rh-ppc64-base
auth --passalgo=sha512 --useshadow
selinux --disabled
firewall --disabled
skipx
firstboot --disable

%post
mkdir /root/.ssh
echo 'ssh-rsa AAAAB3NzaC1yc2EAAAADAQABAAABAQDkG2Q00DnTLjXrU+gP7mxdrEMao55555555555Xs2HzfIjX73f7imMO5dEP7lWEFuKbXgTjgMsaWnFC6SCRiqCBFi9aPcTfTc12FVUHf2D18oqoi2LjqAslHSFUILRwhJi0dn0k6u8U1k7c7oV3VWb1bsMipn86/De+axa7endkXfTLOgWu3A1c/2H/Wf2nfpw2ElPOPZJJ3kVGqCJXFnHbOrWm9nw1GCDfQPNi82qySiuuCPBzjb953JdMrNVX++tmObFr6veH9775z4ucE/a67wp/XnGEy2lYogQcWj5lPULc6bUFSQvl0hT1HotvQlaywm2fB1eb6U88RSUV5VZ user@aix.mydomain.org'>> /root/.ssh/authorized_keys
%end

RHEL 7:
same as for RHEL 6, only the url line is different:
url --url http://aix-mgmt.lnz.lab.dynatrace.org/export/nim/rhel_7.6_ppc64

----------------------------------------

7. Netboot:

After all these steps have been prepared, netboot of RH LPAR can be initiated from HMC:
ssh hscroot@hmc01 "lpar_netboot -v -f -D -i -t ent -s auto -T off -d auto -S 172.23.74.4 -C 172.23.72.15 -G 172.23.72.1 -K 255.255.248.0 rh-ppc64-lpar default_profile man-sys-01"

----------------------------------------

if needed logging in yaboot.conf or grub.conf: https://wwoods.fedorapeople.org/doc/boot-options.html#_inst_syslog
user@aix-mgmt:/var/log $ tail -f user

----------------------------------------

Article 1

$
0
0
Git Basics

The purpose of Git is to keep track of the changes, which have been made on files. In more official wording: Git is a distributed version control system. Version Control System can be any software that records changes to files over time so that you can recall specific versions later. It helps software teams to keep track of modifications to the source code. If a mistake is made, developers can turn back the clock and compare earlier versions of the code to help fix the mistake. (Git was created by Linus Torvalds in 2005 to help during the development of the Linux Kernel with other kernel developers.)

Git is distributed, which means everyone has a local copy of all the files, so they can work independently of a central server. (In opposite, a Central Version Control system is  located in one place, and people can check out from the central location, make changes and check everything back in.)

When someone completes a task, he needs to do a commit. Commit is a snapshot of the state of your files, plus some metadata (such as who made the commit and when, with a comment, and a pointer to the previous commits). Every time you commit, or save the state of your project, Git basically takes a picture of what all your files look like at that moment and stores a reference to that snapshot. As time goes by, each commit is pointing to its parent to keep track all the changes that have been made:

Arrows are identifying a commit's parent (pointing to the left)


Some terminology:
-repository - this is where git stores all details, metadata which is needed for tracking (.git directory in the project dir)
-commit     - record changes to the repository (the local one)
-branch     - like in a tree, another path is taken in the main line of development, so the main line keeps untouched
-merge      - will take the independent lines of development (branches) and integrate them into a single branch
-master     - the repository’s main branch, usually other branches are checked out from this
-clone      - copies an existing git repository, which we don't have, (it is usually used only once)
-fetch      - downloads commits, files ...from a remote repository into your local repo and updates that local copy
-pull       - fetch (download) content from a remote repository and update local repository. (git fetch followed by git merge)
-push       - is used to submit the code to a remote repository
-head       - is a reference which points to the last commit we have made.
-checkout   - switch to another branch. To prepare working on a branch. (Pointing the head to that branch)

----------------------------------------------

Repository (.git directory)

Git stores all necessary information, metadata (which is needed to track all changes) in a data structure called a repository. The Git repository is in the same directory as the project itself, in a subdirectory called .git. You can obtain a Git repository in one of two ways:

1. You can take a local directory that is currently not under version control, and turn it into a Git repository.
You can go to any directory and use the command: git init. This creates a new subdirectory named .git that contains all of your necessary repository files. At this point, nothing in your project is tracked yet. If you want to start version-controlling existing files , you need to track those files (with git add) and do an initial commit (git commit).

2. You can clone an existing Git repository from elsewhere.
If you want to get a copy of an existing Git repository, "git clone" needs to be used. Then Git receives a full copy of all data that the server has. Every version of every file for the history of the project is pulled down by default

git clone <url>                        <--clone a repository to the current directory
git clone <url> <new name>              <--clone the repository into a directory named something other

----------------------------------------------

Working with Git

During our work in Git (using specific Git commands) our files can be in different states:
-Committed: It means that the data is safely stored in your local database.
-Staged: It means that you have marked a modified file in its current version to go into your next commit.
-Modified: It means that you have changed the file but have not committed it to your database yet.

The basic Git workflow goes something like this: 
You switch to the project you would like to work with command: git checkout. The you start to work in your working directory and modify files there. After finishing some work, you mark the files you have been worked on with command: git add. This will stage those files to be part of the next commit. In other words it will add those changes (files) to the staging area. After that when you do a commit, it will take the files as they are in the staging area and stores that snapshot permanently to your Git directory.


The .git directory is where Git stores the metadata and object database for your project. This is the most important part of Git, and it is what is copied when you clone a repository from another computer. If a particular version of a file is in the Git directory, it’s considered committed.

The staging area is a file, generally contained in your .git directory, that stores information about what will go into your next commit. If a file has been modified and was added to the staging area (with the command git add), it is staged.

The working directory (sometimes it is called working tree) is a single checkout of one version of the project. These files are pulled out of the compressed database in the Git directory and placed on disk for you to use or modify.

Everything in Git is check-summed before it is stored (committed) and is then referred to by that checksum. This means it’s impossible to change the content of a file or directory without Git knowing about it. The mechanism that Git uses for this checksumming is called a SHA-1 hash. This is a 40-character string.

 ----------------------------------------------

Starting to work with git

After install (like yum install git) some configuration is needed, for example to add your name to the checkouts and changes.
Config details can be seen by "git config --list" and changing configs can be done:

git config --global user.name "<user name>"
git config --global user.email "<user email>"

After that we can start to initialize a directory to be tracked by git:
1. go to the directory you would like to track
2. git init (it will create a .git directory which contains all details needed for tracking)
3. git status (show status of files if those are up to date, tracked etc..)

If there are files we don't want to track create .gitignore file:
# vi .gitignore:
.filename
*.filename

If this file exists "git status" will not show that file.

----------------------------------------------

Adding files to Staging area

When a new file is created it is not tracked automatically by Git. Git needs to be informed directly to track that file with git add. If you modify the file after you run git add, you have to run git add again to stage the latest version of the file. Otherwise the version when it was when you last ran the git add command will go into the commit, not the version of the file as it looks now.

This message can pop up in this case: “Changes not staged for commit”:
It means that a file that is tracked has been modified in the working directory but not yet staged. To stage it, you need to the git add command, which is a multipurpose command. You use it to begin tracking new files, to stage files, and to do other things. It may be helpful to think of it more as "add precisely this content to the next commit"

----------------------------------------------

Committing files:

When your staging area is set up, you can commit your changes. The usage is, git commit -m "Some message". If -m is omitted an editor will be popped up to put commit message there. With the commit, which will do a snapshot of the actual state of the staged files, these things will be saved: who did the commit, commit date, what SHA-1 checksum the commit has, what is the commit message etc.
(The commit records the snapshot you set up in your staging area. Anything you didn’t stage is still sitting there modified.)

1. git add -A                   <--add everything to the staging area
2. git status                   <--show the status
3. git diff                    <--shows changes made to the code
3. git commit -m "message"      <--committing files in the staging area (adds file to the repository)
4. git log                      <-- will show the commit what we made (hash number, name , date, message)

(git commit command commits only to the local branch we are working on and has no effect on other local branches, and it has no effect on remote repository as well)

----------------------------------------------

Commands:

git config --help               <--help
git --version                    <--check version
git init                         <--turn a directory into git repository (.git subdir is added with metadata)
rm -rf .git                      <--stop git tracking that directory by git (remove .git subdirectory)
.gitignore                       <--this file contains all the files which will be ignored from git
                                 
git status                      <--show the actual status of the working dir
git log                         <--shows commit history with hashes, dates, messages
git log --stat                  <--shows which files have been changed and part of the commit
git reflog                       <--shows in order check-outs, commits, resets

git add <file>                  <--adds a files to tracking (or if it is tracked puts in staging, which is needed before commit)
git add -A                       <--adds all files in current dir for tracking or to the staging area (git add . is the same)
git mv <file_old> <file_new>     <--rename a file in Git

git rm --cached  <file>         <--remove a file from git tracking (keeps the file on your hard drive but Git will not track)
git rm <file>                   <--remove a file from git tracking and from working dir (deletes from hard drive)(commit is needed)
git rm -f <file>                 <--if file is already added to staging area, then  -f option (force) is needed for removal
                                 
git reset <filename>            <--remove files from the staging area, unstaging a staged file
git reset                       <--will remove everything from the staging area

git commit -m "<message>"            <--commit  with a message
git commit --amend -m "new message" <--change commit message to a new message
git commit --amend                   <--if we missed a file from last commit and want that to be part of that last commit
                                     (it brings up a vi editor, just save it: wq)

git branch                      <--list all local branches (* will show which branch we are currently working on)
git branch --merged             <--lists the branches that have been merged already
git branch -a                   <--lists all the branches of the repository (not only locally, remotely as well)
git branch -r                   <--lists all remote branches
git branch <new branch name>     <--create a branch
git branch -d <branch>          <--deletes branch locally

git checkout <branch name>       <--changing to the given branch (so we that given branch
git checkout --<filename>        <--if a file is modified and we want to dismiss modifications and go back to the original state

----------------------------------------------

git remote                      <--lists remote servers you have configured (shortname)
git remote -v                   <--shows you the URLs that Git has stored for the shortname
git remote show <remote>         <--show more information about a particular remote

git remote add <shortname> <url> <--add a new remote Git repository as a shortname to reference
git remote add origin <url>       <--will create new remote (called origin) located at the specified link
git remote rename <current> <new><--change a remote’s shortname from <current> to <new>
git remote remove <remote>        <--remove a remote

git clone <url> <where to clone>  <-- clone remote repository to given location
git clone ../remote_repo.git .   <--cloning example

If you clone a repository, the command automatically adds that remote repository under the name "origin". So, "git fetch origin" fetches any new work that has been pushed to that server since you cloned (or last fetched from) it. (git fetch will not do merge, just download the data)

If your current branch is set up to track a remote branch, you can use the git pull command to automatically fetch and then merge that remote branch into your current branch. By default, the git clone command automatically sets up your local master branch to track the remote master branch on the server you cloned from. Running git pull fetches data from the server you originally cloned from and automatically tries to merge it into the code you’re currently working on.

git fetch <remote>                <--get data from a remote project, it pulls down all the data from that remote project
git pull                          <--it is a combination of 2 comands: git fetch + git merge
git pull origin master           <--pulls any changes since the last time we have pulled from a repository

git push origin master            <-- push your master branch to your origin server
git push <remote> <branch>       <--submit branch to the remote repository
git push -u origin <branch name>  <--- -u is doing association between origin and our branch

----------------------------------------------

git diff <file>                             <--shows what exactly has been changed in given file
git diff <hash1> <hash2>                   <--show difference between hashes
git diff <source_branch> <target_branch>    <--doing a preview before a merge
git revert                                  <--will revert everything ???

git tag                                     <--showing tags (these are the versions which are added to  commits)
git tag -a v1.0 -m "Version 1.0 release"   <--point to the current release

----------------------------------------------

Fixing (undoing) a commit (git commit --amend):
(Committing accidentally too early and possibly forget to add some files, or we mess up our commit message.)

If we did a commit and then realize we forgot to stage the changes in a file we wanted to add to this commit, then we can use "git commit --amend" to fix this:
1. git commit -m "<initial commit>"
2. git add <forgotten file>
3. git commit --amend

The second commit replaces the first, as a result we end up with a single commit, and the earlier commit will not show up in the repository history

This command takes the staging area and uses it for the commit. If there are no changes since the last commit (if we run this command immediately after a commit) then only the commit message can be changed. A commit-message editor pops up, which already contains the message of our previous commit, which we can change and save.

-----------------------------------------------------

Branch and Merge:

Branch:
1. git branch                     <--shows how many branches we have (* shows which branch we are currently on)
2. git branch <name>              <--create a new branch
3. git checkout <branch>           <--switch to the given branch
4. do some work there

Merging a branch to master (locally and remotely)
(All merging is done into the branch where you are.)

1. git checkout master            <--switch to our master branch
2. git pull origin master         <--pull the changes down to make sure if there were any changes by others we have those
3. git branch --merged             <--lists the branches that have been merged already (our branch is not on the list)
4. git merge <branch name>        <--merge given branch to where we are (currently it is master)

After merging branch to the master (local), these changes can be pushed to the remote master:
git push origin master            <--all these changes are pushed to the master on the remote repository

-----------------------------------------------------

Deleting a branch

After we finished merging our branch, that feature is done and we can delete that branch:
1. git branch --merged            <--just to double check everything was successfully merged
2. git branch -d <branch>         <--deletes branch locally

If we pushed that branch to the remote repository, we can delete from there as well:
git branch -a                     <--list branches (our local branch is not there anymore, but we still have on remote repository)
git push origin --delete <branch>  <--to delete a branch on remote repository

-----------------------------------------------------

Fixing an accidental commit to a wrong branch:
(moving a commit to another branch)

1. git log                         <--check the hash of the commit you want to move (only first 6-8 characters)
2. git checkout <branch>           <--switch to the branch (you can check git log again)
3. git cherry-pick <hash>          <--it will bring over the given commit to the branch where I am

We still have the commit on the master branch (cherry-pick will not delete that). To delete that from the master branch:
4. git checkout master             <--switch to master branch
5. git log                         <--check hash and commits
6. git reset ….                    <--reset back a specified commit, it has 3 types (soft, mixed, hard):
        git reset --soft <hash>    <--reset back a commit, but will keep files in staging area
        git reset --mixed <hash>   <--(default) it is same as soft, but files will be not in staging area, instead in the working dir
        git reset --hard <hash>    <--reset all tracked file to the state that they were (it leaves any untracked file there)
7. git clean -df                  <--after git reset, get rid of any untracked directories (-d) and untracked file (-f)

-----------------------------------------------------

Viewing all 67 articles
Browse latest View live